Materials to Maintain Your ZHP IIIII Hand Protection IIIII Tools to Maintain Your ZHP
Page 1 of 15 12311 ... LastLast
Results 1 to 10 of 145
  1. #1
    Join Date
    Jan 1970
    Location
    Ocean County, NJ
    Posts
    7,273

    E46 BMW Control Arm Bushing DIY doityourself

    Since this is a common failure item for our cars, I figured I'd throw a DIY in here.

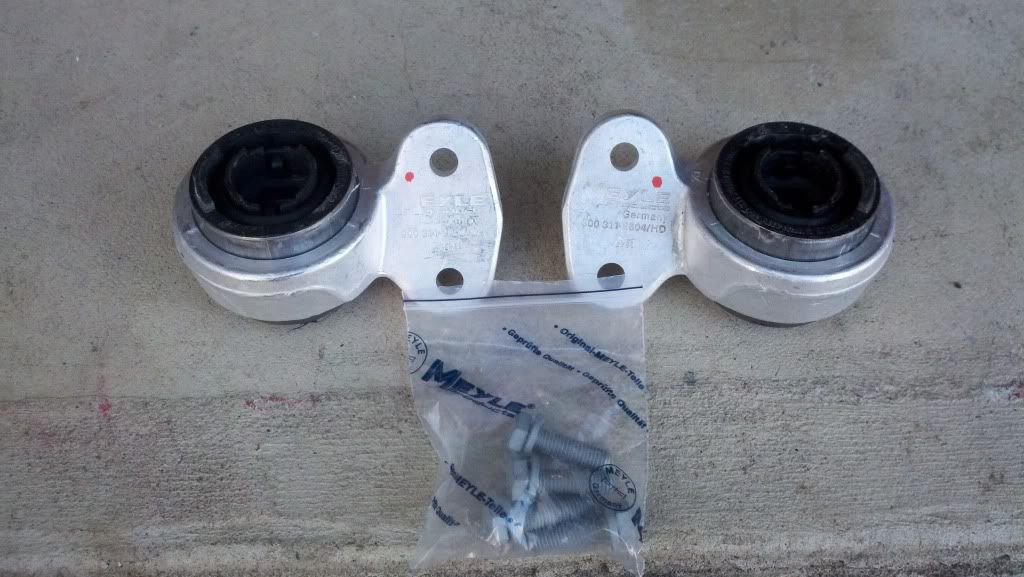
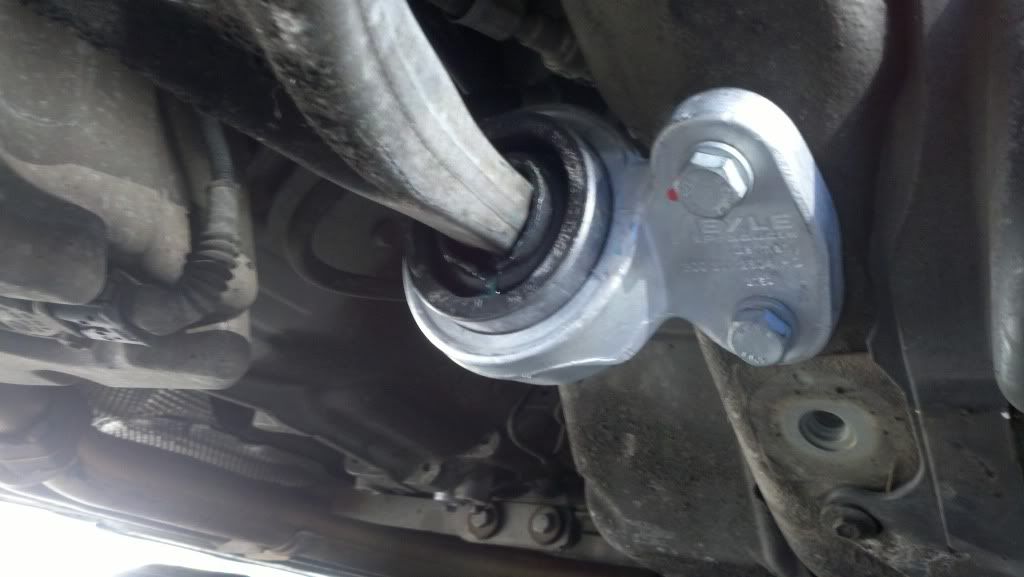
    For starters, this is what a bad CAB looks like:


    Make sure that you have new bolts for your new CABs. If you don't, I've been told by independent mechs that it is acceptable to reuse the old bolts with some blue locktite.


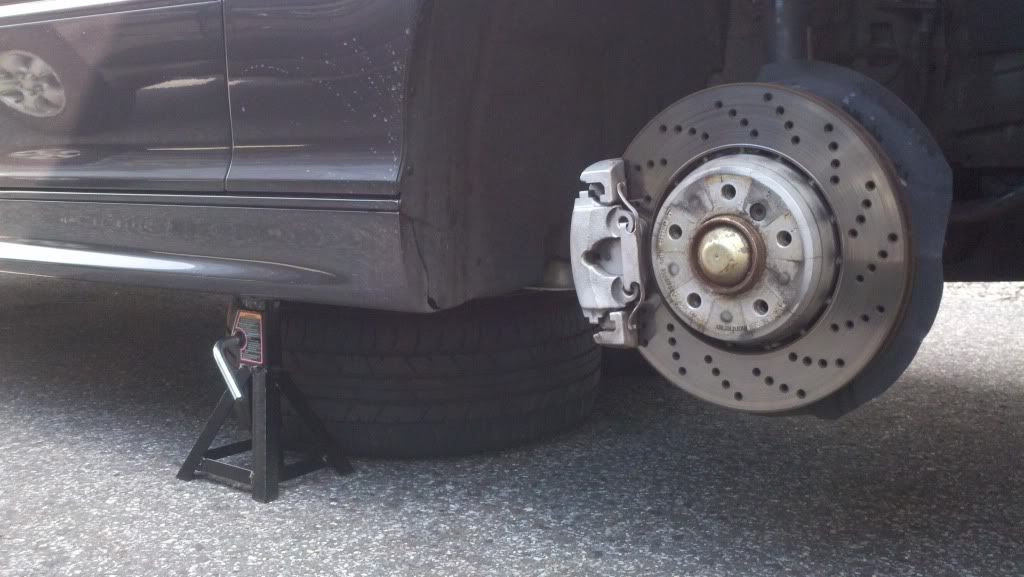
    1. Get the car up on jack stands and remove the front tires. I like to put the tires under the car as an extra safety measure so I feel a little better while crawling around under the car.


    2. Remove the splash shield. Now's a good time to Simple Green or otherwise clean up the splash shield so you can easily spot any leaks in the future. Mine had some oil on it from either my former leaking VCG or the Vanos job.

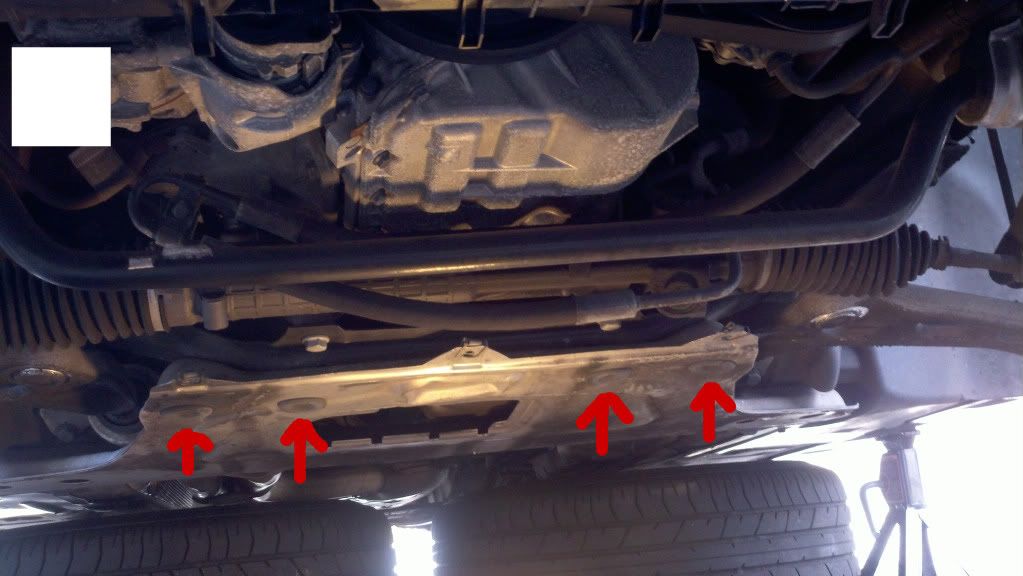
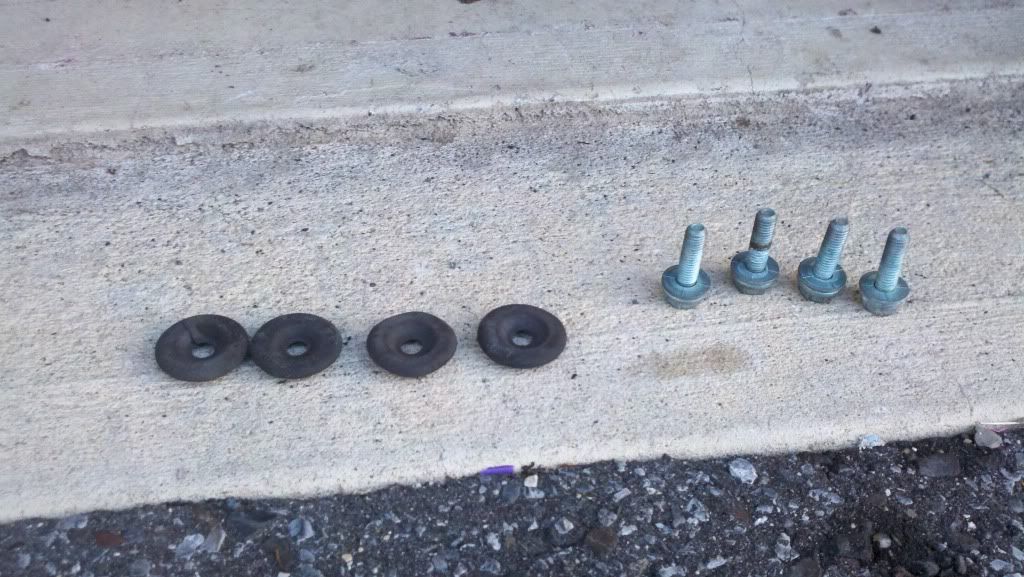
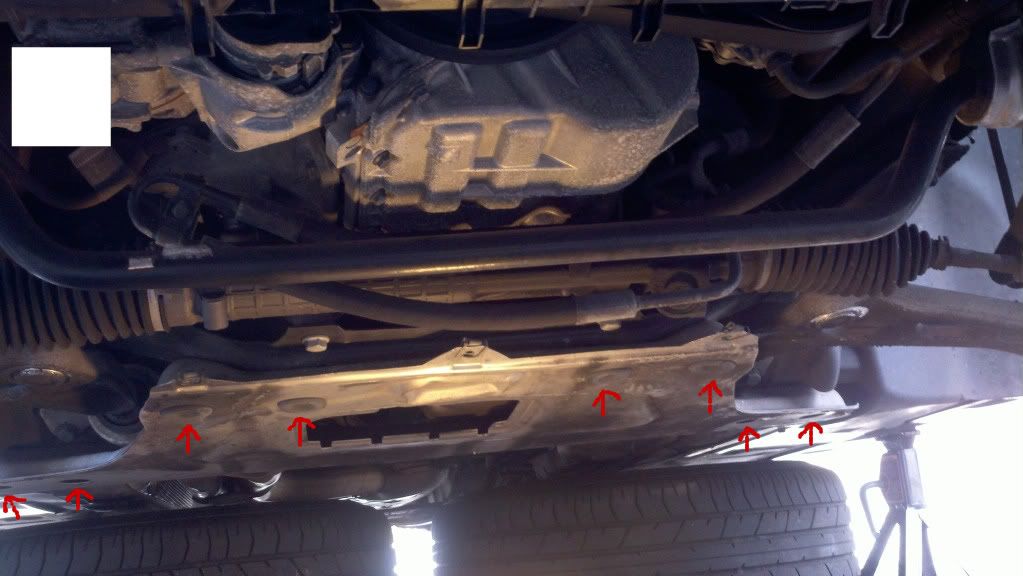
    3. Now we're moving on to the aluminum sub frame brace. Start by removing the 4 rubber plugs that cover the access holes for the bolts (pictured below) Note: my 325 did not have these-- was surprised to see them when I got under the ZHP


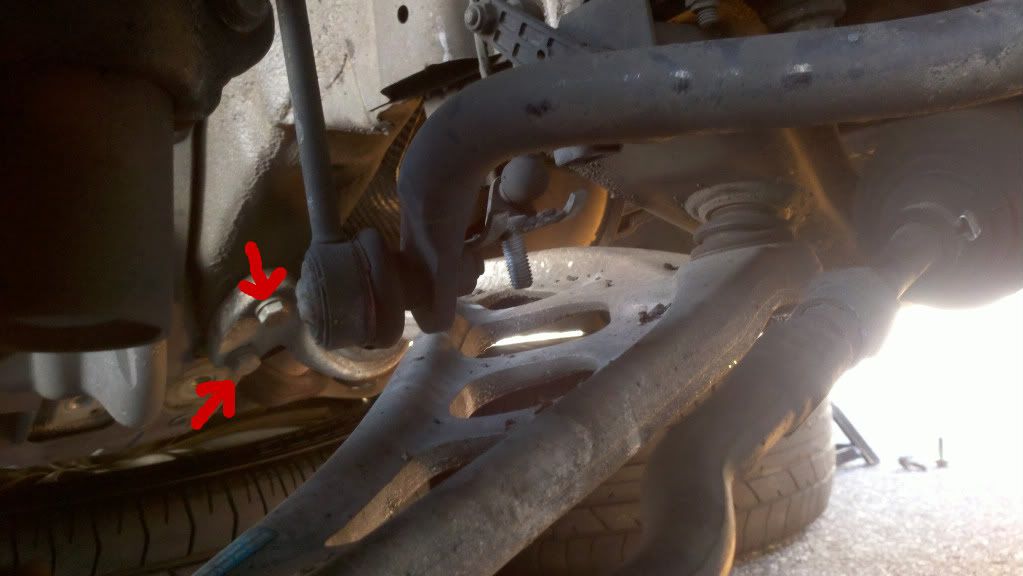
    4. Now Remove the aluminum sub frame brace by removing the 8 bolts shown below (picture still shows rubber plugs which you should have just removed).


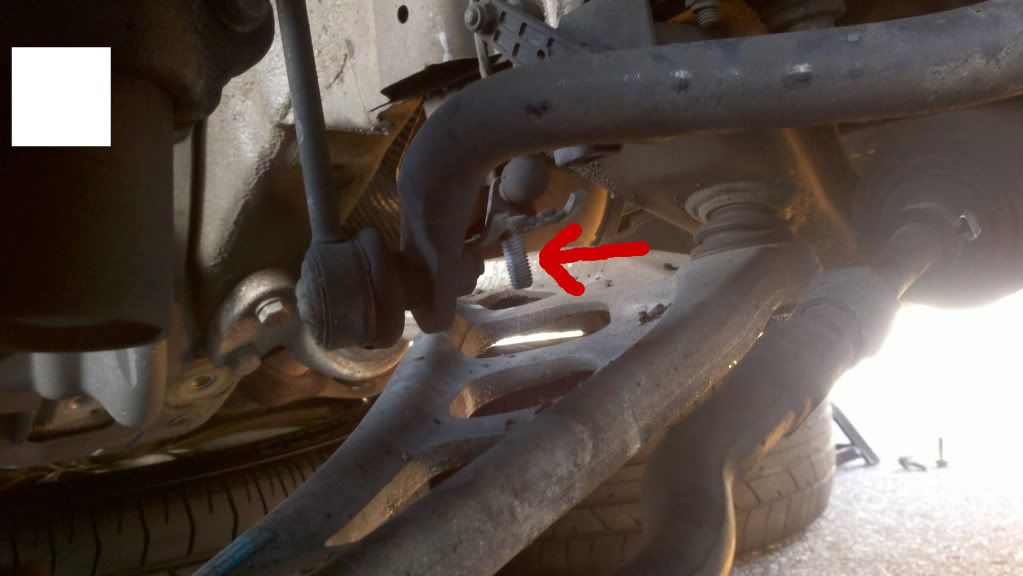
    5. If you have auto-leveling headlights, remove the nut that secures the auto-leveling sensor to the passenger side control arm and pull the leveler straight up and clear of the control arm (pic below). If you don't do this and push down too hard on the control arm during the removal of the CABs, you risk breaking the sensor.


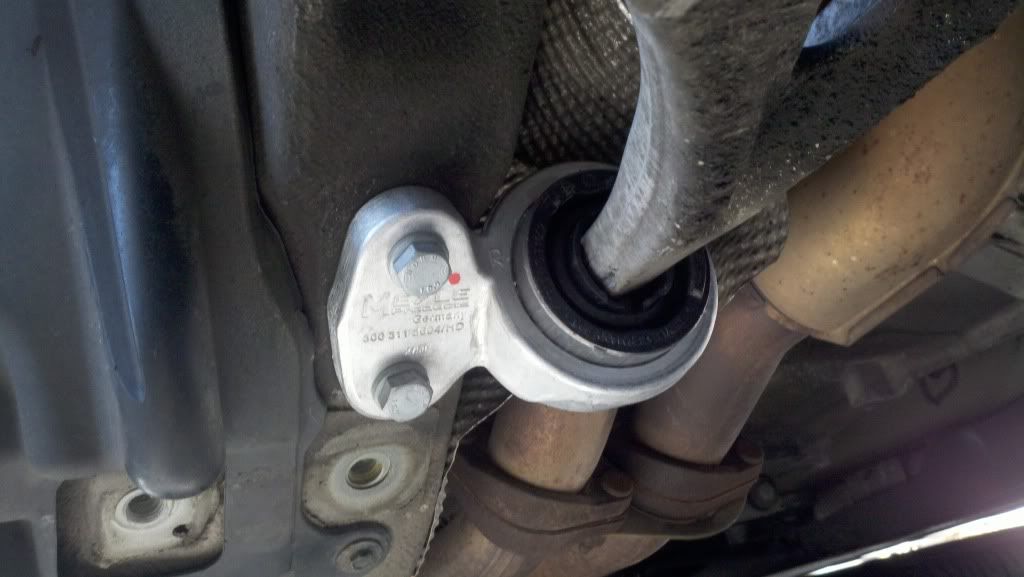
    6. Remove the 2 bolts that secure the passenger side control arm bushing (pic below).


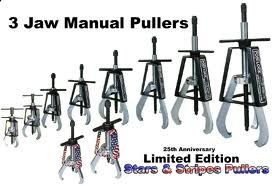
    7. Get your three-jaw puller and remove the old bushing. In my case, the puller removed the carrier but left the inner portion of the bushing on the control arm. I had to keep at it for a little while with the puller to get the inner portion off. Just be patient and it will come.

    8. Repeat steps 6/7 for the drivers side.

    9. Use some cheap dish soap to lubricate the inside of the new passenger side bushing and press the new bushing onto the control arm. This takes a fair amount of force. You can use a dead blow hammer. I didn't have a dead blow so I used a block of wood and a 4 lb sledge.

    10. Lift the control arm so the holes of the carrier line up to the mounting holes on the car. It may be necessary to twist the bushing on the control arm a little to get it to line up properly.

    11. Secure with your new bolts (or old bolts with blue locktite). Torque to 44 ft lbs.


    12. Repeat steps 10/11 for drivers side.


    13. Lower the auto-leveling sensor back into the hole in the passenger side control arm and secure with the nut.

    14. Replace the aluminum sub frame brace using the 8 bolts. Do not tighten the bolts when you start replacing them. You may need some play to get all of the holes lined up properly. Once you have all 8 bolts properly seated, torque the bolts to 43 ft lbs and then 90degrees plus 30 degrees with a torque angle gauge. I do not have an angle gauge so I went 43 ft lbs plus Uncle Keith's eyeball 30 degrees...

    15. Replace the splash shield.

    16. Remount your tires.

    17. Lower your ride and torque your lug bolts to 88 ft lbs. Make sure you get the front tires back on the ground to load the suspension before the soap dries up. You should have plenty of time to do this, so don't rush and dump your car off of the jack stands-- just don't leave her up in the air for another couple of hours.

    18. Have a beer, cigar, yoo hoo, or whatever else you use to celebrate a job well done.

    Short cut Method: Courtesy of Lespaulman, here is a short cut and much faster way to get the LCABS off:

    Quote Originally Posted by Lespaulman16 View Post
    This is a well written DIY, but fwiw, there is an exceptionally easier way to do this.

    After you remove both bolts from the LCAB, the control arm and bushing drop away from the frame. Put one of the bolts back into it's threaded hole about 1/2 way. Take the tip of a long pry bar (I use a 42" or a 60") and wedge against the bolt head. Put the shaft of the pry bar on the metal bottom of the bushing. Use the pry bar to push the bushing off the control arm. Using this method and full air tools, it takes less then 15 min from start to finish to replace BOTH sides


    Sent from an over-glorified pager


    Sent from my kick-A Galaxy S3
    Last edited by kayger12; 03-27-2011 at 04:23 PM.
    -Be yourself; everyone else is already taken.
    ZHP Pre-Ride Briefing

    2005 ZHP, Alcantara, Silver Cube, Nav, Sharked, BMW Perf Intake, BMW Perf CF Strut Brace, CF Valve/Fuel Rail Covers,
    Shadowline Grills, CF Splitters, Fog Light Inserts, Euro-mirrors, CDV Delete, Beisan vanos, GAS DISA, BP Coded

  2. #2
    Join Date
    Jan 1970
    Location
    Liberty Township, OH
    Posts
    37,935
    Very nice my man. Suspension should be loaded prior to soapy water drying up also.

    Nice touch with the HID Auto level comment. Like!
    Call Me Dane l 2/2004 330i ZHP l 18x8 ET45 BBS CK's wrapped with Michelin Pilot Sport AS3+ @ 245-40-18 l KW V1 Coilovers in front l KW V1 springs w/ Bilstein B8 dampeners in rear l BMW Performance Rotors l UUC StrutBarbarian l Racing Dynamics Rear Strut Bar l Jim Conforti Shark Injector l Light Birch Interior Trim l Bimmian Celly Mount l M3 Trunk Mat l l e90 Performance E-Brake & Shift Knob l M3 Tri-Stitched Boots l AL Headlight Retrofit with ZKW Lenses l CobyWheel Wrap w/M3 Stitching l LCM sw 4.5 triple blink and rear fogs l Maple Interior Trim

  3. #3
    Join Date
    Jan 1970
    Location
    Ocean County, NJ
    Posts
    7,273
    Good info, DW. Added.
    -Be yourself; everyone else is already taken.
    ZHP Pre-Ride Briefing

    2005 ZHP, Alcantara, Silver Cube, Nav, Sharked, BMW Perf Intake, BMW Perf CF Strut Brace, CF Valve/Fuel Rail Covers,
    Shadowline Grills, CF Splitters, Fog Light Inserts, Euro-mirrors, CDV Delete, Beisan vanos, GAS DISA, BP Coded

  4. #4
    Join Date
    Jan 1970
    Location
    Liberty Township, OH
    Posts
    37,935
    Quote Originally Posted by kayger12 View Post
    Good info, DW. Added.
    Keith, I appreciate you taking the time to document and type this up for the site. Truly a class act.

    Note: I would rather have the car fall on me than the 135's...lol....j/k. Nice safety touch. What about goggles? Hehe.
    Call Me Dane l 2/2004 330i ZHP l 18x8 ET45 BBS CK's wrapped with Michelin Pilot Sport AS3+ @ 245-40-18 l KW V1 Coilovers in front l KW V1 springs w/ Bilstein B8 dampeners in rear l BMW Performance Rotors l UUC StrutBarbarian l Racing Dynamics Rear Strut Bar l Jim Conforti Shark Injector l Light Birch Interior Trim l Bimmian Celly Mount l M3 Trunk Mat l l e90 Performance E-Brake & Shift Knob l M3 Tri-Stitched Boots l AL Headlight Retrofit with ZKW Lenses l CobyWheel Wrap w/M3 Stitching l LCM sw 4.5 triple blink and rear fogs l Maple Interior Trim

  5. #5
    Join Date
    Jan 1970
    Location
    Ocean County, NJ
    Posts
    7,273
    Quote Originally Posted by danewilson77 View Post
    Note: I would rather have the car fall on me than the 135's...lol....j/k. Nice safety touch. What about goggles? Hehe.
    LOL- that was exactly what I was thinking as I was pushing them under there.

    I had to settle for my eye glasses for eye pro. Can't put contacts back in until Tuesday and don't have goggles that would fit over my glasses.

    And as for taking the time to document this stuff-- just following your lead my friend. If I give back half as much to this community as you have I'll be feeling pretty good about things...
    -Be yourself; everyone else is already taken.
    ZHP Pre-Ride Briefing

    2005 ZHP, Alcantara, Silver Cube, Nav, Sharked, BMW Perf Intake, BMW Perf CF Strut Brace, CF Valve/Fuel Rail Covers,
    Shadowline Grills, CF Splitters, Fog Light Inserts, Euro-mirrors, CDV Delete, Beisan vanos, GAS DISA, BP Coded

  6. #6
    Join Date
    Jan 1970
    Location
    Liberty Township, OH
    Posts
    37,935
    Call Me Dane l 2/2004 330i ZHP l 18x8 ET45 BBS CK's wrapped with Michelin Pilot Sport AS3+ @ 245-40-18 l KW V1 Coilovers in front l KW V1 springs w/ Bilstein B8 dampeners in rear l BMW Performance Rotors l UUC StrutBarbarian l Racing Dynamics Rear Strut Bar l Jim Conforti Shark Injector l Light Birch Interior Trim l Bimmian Celly Mount l M3 Trunk Mat l l e90 Performance E-Brake & Shift Knob l M3 Tri-Stitched Boots l AL Headlight Retrofit with ZKW Lenses l CobyWheel Wrap w/M3 Stitching l LCM sw 4.5 triple blink and rear fogs l Maple Interior Trim

  7. #7
    Join Date
    Jan 1970
    Location
    Jersey Shore
    Posts
    378
    Nice write up Keith. I'll be tackling this when the 135's go on in 2 weeks. A few questions though:

    1. Whats a three jaw puller? Do you need one or can the job be done without one/or with something else?
    2. Whats with the soapy water? Just to help slide the new bushing on?

    03 TiAg 330i ZHP
    -Alex

  8. #8
    Join Date
    Jan 1970
    Location
    Liberty Township, OH
    Posts
    37,935
    The job can be done without a 3 jaw puller. I usually use a dremel.


    Droid! Srs Legitness!
    Call Me Dane l 2/2004 330i ZHP l 18x8 ET45 BBS CK's wrapped with Michelin Pilot Sport AS3+ @ 245-40-18 l KW V1 Coilovers in front l KW V1 springs w/ Bilstein B8 dampeners in rear l BMW Performance Rotors l UUC StrutBarbarian l Racing Dynamics Rear Strut Bar l Jim Conforti Shark Injector l Light Birch Interior Trim l Bimmian Celly Mount l M3 Trunk Mat l l e90 Performance E-Brake & Shift Knob l M3 Tri-Stitched Boots l AL Headlight Retrofit with ZKW Lenses l CobyWheel Wrap w/M3 Stitching l LCM sw 4.5 triple blink and rear fogs l Maple Interior Trim

  9. #9
    Join Date
    Jan 1970
    Location
    Ocean County, NJ
    Posts
    7,273
    Quote Originally Posted by adb1028 View Post
    Nice write up Keith. I'll be tackling this when the 135's go on in 2 weeks. A few questions though:

    1. Whats a three jaw puller? Do you need one or can the job be done without one/or with something else?
    2. Whats with the soapy water? Just to help slide the new bushing on?
    I got my 3 jaw puller set from Harbor Freight. I believe they have a store in Brick. http://www.harborfreight.com/3-piece...-set-8832.html

    I use straight dish soap as opposed to soapy water. It acts as a lubricant so the bushing goes on easier and also so it sets properly when you load the suspension.

    I also read a DIY where the guy used glass cleaner as a lubricant, but that seems like it would dry up way too fast for me.

    You can use anything that will dry up-- you just want to avoid using things like oil or grease which won't dry.

    If you want to meet up somewhere, you can borrow my puller set. Just shoot me a PM or a call if you still have my number.
    -Be yourself; everyone else is already taken.
    ZHP Pre-Ride Briefing

    2005 ZHP, Alcantara, Silver Cube, Nav, Sharked, BMW Perf Intake, BMW Perf CF Strut Brace, CF Valve/Fuel Rail Covers,
    Shadowline Grills, CF Splitters, Fog Light Inserts, Euro-mirrors, CDV Delete, Beisan vanos, GAS DISA, BP Coded

  10. #10
    Join Date
    Jan 1970
    Location
    Liberty Township, OH
    Posts
    37,935
    Got mine there also brother.

    Droid! Srs Legitness!
    Call Me Dane l 2/2004 330i ZHP l 18x8 ET45 BBS CK's wrapped with Michelin Pilot Sport AS3+ @ 245-40-18 l KW V1 Coilovers in front l KW V1 springs w/ Bilstein B8 dampeners in rear l BMW Performance Rotors l UUC StrutBarbarian l Racing Dynamics Rear Strut Bar l Jim Conforti Shark Injector l Light Birch Interior Trim l Bimmian Celly Mount l M3 Trunk Mat l l e90 Performance E-Brake & Shift Knob l M3 Tri-Stitched Boots l AL Headlight Retrofit with ZKW Lenses l CobyWheel Wrap w/M3 Stitching l LCM sw 4.5 triple blink and rear fogs l Maple Interior Trim

Page 1 of 15 12311 ... LastLast

Similar Threads

  1. doityourself
    By danewilson77 in forum Minutiae
    Replies: 31
    Last Post: 10-15-2016, 01:38 PM
  2. E46 BMW 330 ZHP Control Arms doityourself
    By danewilson77 in forum Maintenance
    Replies: 109
    Last Post: 12-18-2015, 02:20 PM
  3. Replies: 15
    Last Post: 06-11-2013, 07:43 PM
  4. Differential Bushing Refresh
    By BimmerWill in forum General -- ZHP Related
    Replies: 8
    Last Post: 04-23-2013, 06:38 AM
  5. Subframe bushing tool rental
    By derbo in forum DIY
    Replies: 15
    Last Post: 03-13-2013, 12:33 AM

Posting Permissions

  • You may not post new threads
  • You may not post replies
  • You may not post attachments
  • You may not edit your posts
  •