Materials to Maintain Your ZHP IIIII Hand Protection IIIII Tools to Maintain Your ZHP
Page 1 of 13 12311 ... LastLast
Results 1 to 10 of 127
  1. #1
    Join Date
    Nov 2017
    Location
    Irvine, CA
    Posts
    817

    '04 AW/Blk coupe project (engine replacement first)

    Okay, I thought it's time to start a project thread. I've never chronicled a project before so here goes nothing... I hope it can provide some motivation for others who DIY (especially on jack stands) as others' project threads have for me.

    The background of the car and my acquiring it can be found in this thread: http://www.zhpmafia.com/forums/showt...lk-project-car

    Cliff's Notes version: I bought the car knowing it had an overheat event and that the engine will need replacing. The condition of the exterior and interior was sufficient for me to go ahead with the purchase (Thanksgiving 2017). I thought I scored a good engine from a low mileage (~65k) ZHP from Texas and purchased it off of eBay. Well, long story short the engine was no good (low compression), so I lost the $300 gamble (return shipping; I pre-negotiated full refund if engine was no good).


    Photos from the welcome/introduction thread:


    Coolant in cyl. 3 (and also 4):


    ...


    Puting the car aside for about a year, I found an engine in the classifieds on ZHPmafia, it was local too. ZHPmafia coming through! http://www.zhpmafia.com/forums/showt...-2005-330i-ZHP Thanks, Marc. Spent a weekend helping to pull the engine and moving it back to my house.


    Engine acquired. Start accumulating parts and staging the car for the transplant.

    I figure I'd replace the usual suspects, including:
    • Cooling system: radiator, expansion tank, hoses (including the heater circuit since engine will be out), water pump, t-stat, 1.4 bar coolant cap, o-rings for the coolant pipes attached to engine block.
    • Engine: Beisan Vanos seals and rattle kit, m56 valve cover (get rid of convoluted CCV), oil pan gasket, various o-rings (for both cam position sensors, crank position sensor, and oil pickup tube to pump since oil pan will be off), intake manifold gasket, vacuum lines that are crusty, throttle body to intake manifold gasket, air distribution pipe o-rings to intake manifold, OFHG gasket, pulleys, tensioners, belts, exhaust manifold gaskets (reusing my headers), oil filter, oil, intake elbows.
    • Trans: oil and filter
    • Guibo, CSB.
    • Diff oil.
    • Filters (cabin and intake)


    ...wallet hurts... bank account hates me...

    Maybe I should have chosen video games and Netflix as a hobby.


    First, move the car to the other side of the driveway and put it up on jack stands (my red-sled in the background):


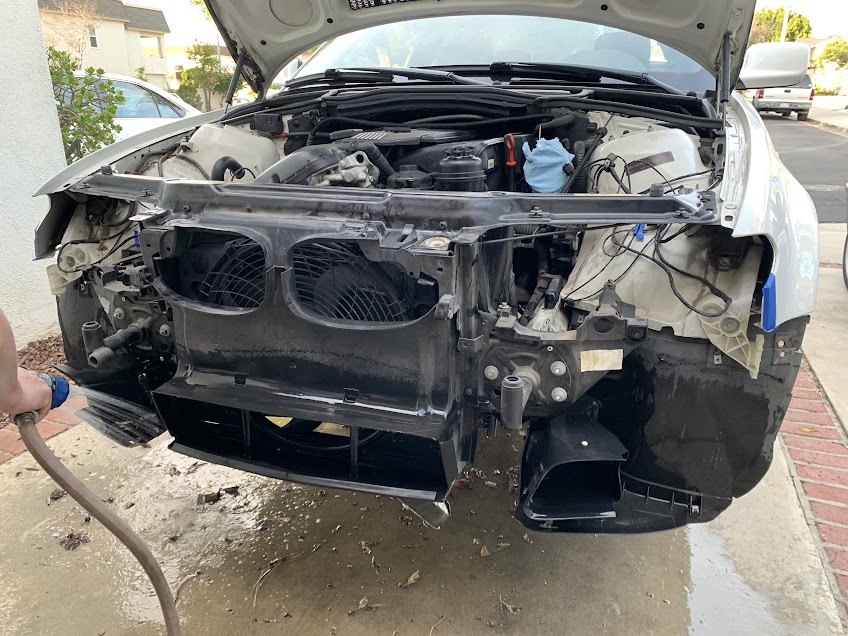
    I figure I'd take the engine+trans out along with the subframe. So, off with the bumper, headlights, radiator+support, etc.

    I knew mice/rats lived in our neighborhood...I've seen rat droppings in the engine bay when parked for days/weeks at a time. I guess it's safe from the predators.

    Evidence of their presence:


    Smelled as bad as it looks.

    The bastard(s) left some bedding, a nest:


    ... intuition said not to stick my hand in there...


    ...turned out the nest was also a burial site. A big one:


    Hope that's a lesson for the rest of them.

    Next, wash off the urine/feces/smells/left overs of dead rat:


    This will do for now:


    Drain the oils (didn't get one of the engine, but equally dark)...


    This will do for now. I need a break. Turning attention towards donor engine for a while.
    Last edited by Will; 01-06-2020 at 04:32 PM. Reason: HAHA, typo in the title! 04, not 02.

  2. #2
    Join Date
    Nov 2017
    Location
    Irvine, CA
    Posts
    817
    Here we go on the donor engine... It had about 65k miles and appeared well taken care of.

    Yup, very clean under the valve cover:


    hmm... where to start...

    Vanos seals, done. Plug for Beisan Systems:


    Another simple one, spark plugs. I love NGK:


    From my non-expert eye, they look alright:


    While working on the top, I cleaned up the m56 valve cover and slapped that on. I didn't want to deal with the CCV and its bundle of brittle, waiting to crack, pipes. Been there, not doing it again:


    Ok, feeling good, check-list getting check marks...

    This was an interesting find... a threaded plug on the back of the cylinder head appeared to be seeping:


    ... no wonder it was seeping, the plug wasn't tight. But it wasn't loose either, kind of like a finger tight... oh well, I'll replace the o-ring and snug it up... or that's what I thought. Unscrewed the plug and found that the threads weren't there for almost the length of the plug:


    WTH? it seems like it was just friction fit, albeit loosely. No wonder it wasn't tight. No bits of aluminum came out when I unscrewed the plug, and none in the hole... where'd the threads go? Probably in the pan and out with the old oil at some point. Oh well. It is what it is. Apparently the plug is M10x1.0. Most Helicoil type repair kits are M10x1.5. Off to Amazon.

    Threads repaired:


    Used some gasket maker and some blue loctite since it's on the back of the cylinder head and won't be accessible once engine is back in:


    Time to replace some coolant pipe o-rings and do some clean up since I have everything out of the way:


    Another surprise... what the heck happened to this o-ring. It seems like it was jacked up when they assembled the engine (or replaced this coolant pipe). Maybe it was assembled on a Friday afternoon. Nevertheless, very un-German. Oh well, glad the o-rings are replaced. Pipe looked good otherwise:


    Onto the other pipe, the one that runs along the base of the cylinder head from the front. And another surprise... anyone see what's wrong?


    ...

    yep, this pipe wasn't in as good of shape:


    Oh well, glad I found it and got the broken pieces out of the cooling tract. My wallet hates me again.


    Cleaning the exterior of the engine will distract me from my wallet:


    Yeah, I got carried away with taping up the threaded holes. My trusty compressor will blow-dry the engine anyways:


    The other side:


    Ok, break time... sit for a while and admire the m54 - better than modern art in my opinion.

    More to follow.
    Last edited by Will; 02-20-2019 at 12:03 AM.

  3. #3
    Join Date
    Nov 2017
    Location
    Irvine, CA
    Posts
    817
    Moving on...

    Replaced the t-stat and water pump, both OE manufacturers per FCPEuro. But yet another surprise. The impeller of the OE replacement (Saleri) doesn't seem as finely finished as the BMW unit. What ever, it'll do.


    [IMG][/IMG]

    Feelings of accomplishment abound. Time to turn attention towards the oil pan. It was pretty clean, but might as well since I was replacing the oil pan gasket. Feel free to enjoy the day's news in Chinese:


    Inside was clean, just like underneath the valve cover.


    I took the opportunity to replace the oil pickup tube o-ring, maybe it was compression-set, maybe not, but it was cheap and I was in there anyways. Clean bottom, everyone likes a clean bottom:


    Oil pan back on, nice and clean:


    Coolant pipes back on, too. I wiped them down with some 303. I wipe down all the plastic parts with 303 aerospace protectant - it's like Armor-all, but actually effective:


    Onto the OFHG. I didn't go with the viton one from Bavauto, I hope I don't regret it. It's pretty easy to replace from the topside if I need to do it, so I'm not worried about it:


    Now to the intake manifold. New gasket (yes, for cylinders 1-3 as well, just not in the picture). Yep, wiped down the manifold with 303 (the bottle is in the background lol). Did I mention I love that stuff? Maybe I'll buy some stock in their company.


    Knock sensors back on, intake manifold and OFH back on... it's looking like an engine again:


    That's it for now. At this rate, the transplant should be done in late 2020.

    Oh, something else I learned: SuperClean is very effective, and the only difference between the Foaming and regular version is the spray bottle. I've been refilling the Foaming version spray bottles from a gallon jug (which doesn't say Foaming), but it continues to foam.

    I'll update it after some more progress.
    Last edited by Will; 02-20-2019 at 12:12 AM.

  4. #4
    Join Date
    Nov 2017
    Location
    Irvine, CA
    Posts
    817

  5. #5
    Good looking white coupe. Sounds like you will have a sweet ride with a strong engine in the not too distant future. Good luck.
    2004 CiC 6MT Silver Gray (A08) Black Interior 1 of 51 Made
    Intravee - Navigation - Back-up Sensors - Cold Weather Package - Home Link Mirror
    Winter Hardtop, too - A Sweet Ride

  6. #6
    Join Date
    Feb 2013
    Location
    Austin TX
    Posts
    7,597
    Good progress here. Are you sure it's a 2002 ? I'm pretty sure the ZHP started on 2003.
    2005 IR / black / 6MT
    157,000 miles

  7. #7
    Join Date
    Jan 1970
    Location
    Southern California
    Posts
    18,064
    Good luck on the project!

    Sent from my SM-G955U using Tapatalk
    Randeaux/Rando/John/jr - '06 Cic ZHP; Southern California
    "ZHP or not, I still like you"


    ZHP Performance Package, Cold Weather Package, Leather, Jet Black/Black/BlackCube, NAV, Anthracite Black "my individual" interior trim
    ESS Stage 1 Twin Screw Supercharger, Sprint Booster, BMW Perf Intake, Magnaflow Exhaust, Dinan TB & STEP S/W, UCC Sway Bars, Apex EC-7 18x8.5 ET38
    Suspension: AST 44100 dampers, Bimmerworld front adjustable end links, Swift springs (8K front, 10K rear), Vorshlag camber plates
    Dynavin D99+, Hardwire V1 (w/V1 Connection), BSW Stage 1 Speakers, Kicker Amp/Subwoofer
    BMW Performance Strut Brace, Orion V2 Angel Eyes, No-holes License Plate, SMG Paddle Shift Mod, Besian VANOS, Gold DISA, Fan Delete, M3 Side Mirrors
    Note: Actual car no longer resembles signature picture

  8. #8
    Join Date
    Nov 2017
    Location
    Irvine, CA
    Posts
    817
    Quote Originally Posted by johnrando View Post
    Good luck on the project!

    Sent from my SM-G955U using Tapatalk
    Thanks! I figure it's simply turning a wrench for the most part (and the hit to the wallet, and time and effort involved... like i said, just turning a wrench. Lol)

    Good progress here. Are you sure it's a 2002 ? I'm pretty sure the ZHP started on 2003.
    Hmm. you're right. Maybe a typo on my part. The car is a 2004, and the engine was from a 2005. Soooo.... does that make this a 2004.5 now? No, I don't think it does. But it's good to know the engine has 34k fewer miles than the one I'm replacing.

    Good looking white coupe. Sounds like you will have a sweet ride with a strong engine in the not too distant future. Good luck.
    Thanks! That's what I was thinking, too. It just seemed "too nice" of a ZHP for it to end up at a junkyard/pick-n-pull. It'll be a nice car once done, both mechanically and aesthetically - that's the goal, anyways. And, yes, hopefully in the not too distant future. One step at a time.

  9. #9
    Join Date
    Nov 2017
    Location
    Irvine, CA
    Posts
    817
    Quote Originally Posted by fredo View Post
    Good progress here. Are you sure it's a 2002 ? I'm pretty sure the ZHP started on 2003.
    Hahaha, I just noticed the typo in the title of the thread - good eye! Typo is now fixed, thanks for pointing that out.

  10. #10
    Join Date
    Nov 2017
    Location
    Irvine, CA
    Posts
    817
    A bit more progress today: alternator and pulleys are on. It's looking more and more like a complete engine.

    I went with INA pulleys/tensioner, and reused the alternator (after a generous hosing with Electromotive to clean off the built-up dirt/dust/"gunk." The water pump pulley is an ECS metal one that I've had sitting around for a few years. I probably purchased it when it was offered at a discount, can't remember. Originally, I was going to put it on my '01 330i, but for some reason decided the original plastic one was still good. Now it's getting put to good use. The plastic parts are still okay, in my opinion, but since I had it laying around I figured "why not."

    The sharpie marks on the nuts and bolts are just for my reference, indicating that it's been torqued appropriately.


Page 1 of 13 12311 ... LastLast

Similar Threads

  1. Engine Replacement
    By SureShot434 in forum Performance
    Replies: 163
    Last Post: 08-19-2020, 05:44 PM
  2. Replies: 290
    Last Post: 10-03-2019, 08:29 AM
  3. Just joined; '04 coupe AW/Blk project car
    By Will in forum New Members (or older members who have not introduced themselves)
    Replies: 10
    Last Post: 11-30-2017, 07:06 PM
  4. Lorenzo's ZHP Coupe Project
    By Lorenzo in forum Projects
    Replies: 60
    Last Post: 02-07-2016, 10:05 AM
  5. Engine and Transmission Mount Replacement
    By Hornung418 in forum Maintenance
    Replies: 12
    Last Post: 12-12-2012, 05:31 PM

Posting Permissions

  • You may not post new threads
  • You may not post replies
  • You may not post attachments
  • You may not edit your posts
  •