That's interesting. I've seen some for 3800 aud, which is stupid cheap for a 4.4 V8 haha. Can't speak for maintenance history though.
Sent from my SM-N960F using Tapatalk


 Enforcer
That's interesting. I've seen some for 3800 aud, which is stupid cheap for a 4.4 V8 haha. Can't speak for maintenance history though.
Sent from my SM-N960F using Tapatalk
'03 325i 6MT Individual - Estoril Blue
Enforcer
Headlights:
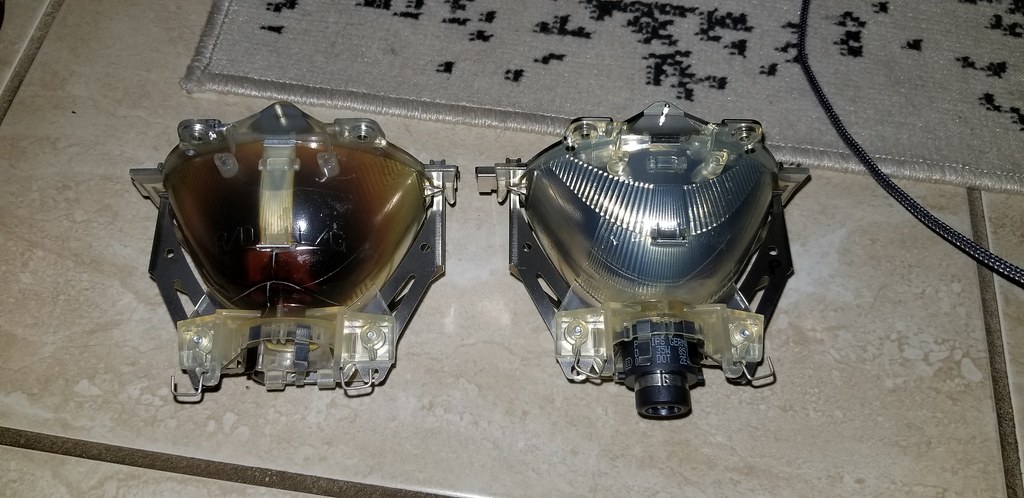
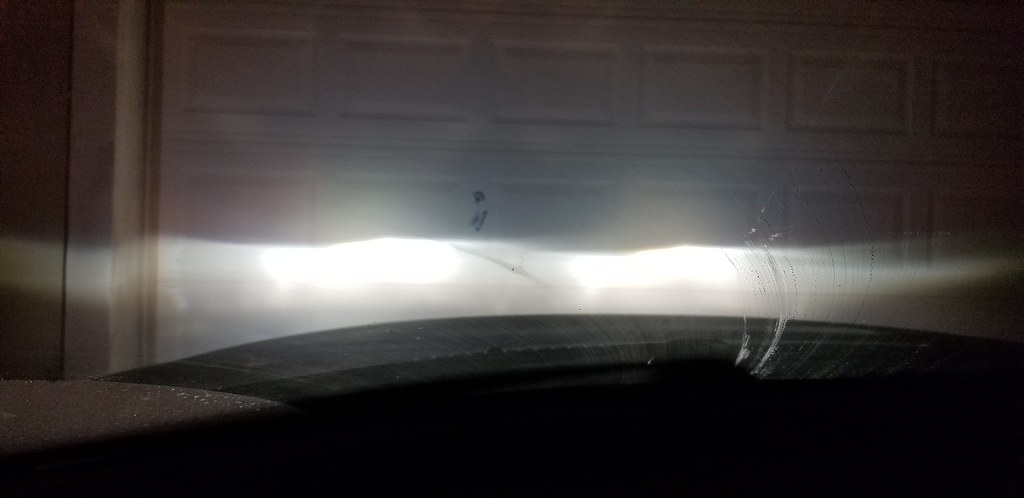
Put some replacement ZKW reflector bowls in the headlights and whoa! Let there be light! PO must have adjusted the headlights up thinking the dimness was an adjustment issue, because as soon as I replaced the reflectors, I was lighting up the trees. Readjusted them down to what looks normal and what a night and day difference.
Now I just need to figure out how to see if the self leveling works. When I turn on the headlights, I expect them to cycle up and down, but they don't do that. Is there a way to test them?
Audio:
So my front left tweeter has been totally dead and the right rear midrange up in the parcel shelf is very quiet. In a quest to fix the weird speaker issues, I first picked up a new midrange and tweeter. The midrange is easy to swap, so tried that first. No dice.
Then picked up a Harmon Kardon amp from the JY thinking that was the issue. Nope.
That basically narrowed it to the radio, which interestingly enough has a dimmer display than the rest of everything and the volume knob only turns the volume up no matter which way you turn it. Guess I should have started with the radio. I got lucky and found one in a car that looks to be in near perfect shape. That immediately fixed the right rear midrange, but the front left tweeter is still dead. Probably just the speaker. I will replace that when I do the window regulator soon.
Unfortunately, the PO broke some of the plastic tabs off the silver cube trim piece above the glove box when he must have wired in the Aux input. That explains why the two trim pieces were fitting loose. So I have to try to fab up some glue to make a tab to hold that silver pin in place, because it appears this trim is hard to find and expensive.
Rain sensor:
After trying a few rain sensors, I think I got one that actually works. Hopefully it stays functional with my windshield and doesn't reinitialize to useless. But putting my hand over it triggers the wipers, so that may be a win for a whole $4.
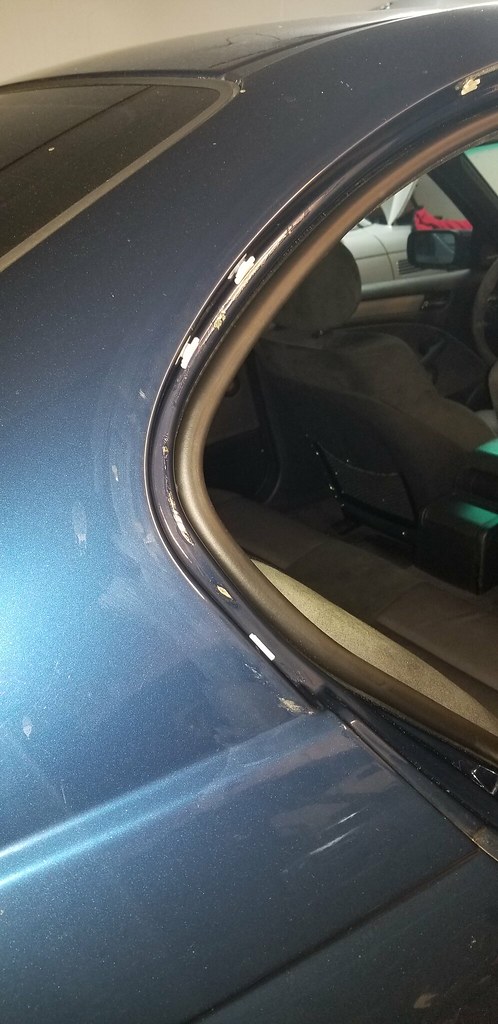
Rain gutter trim:
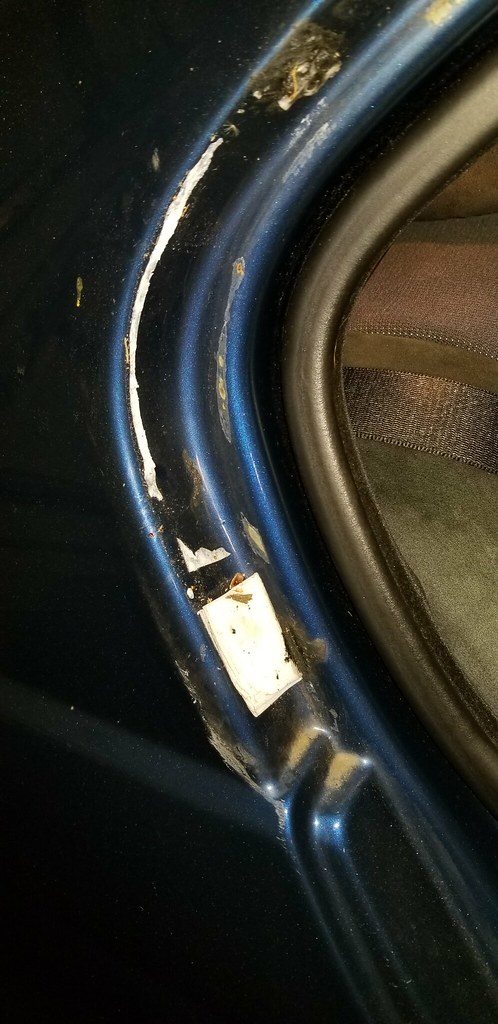
I'm working on the rain gutters now. I took the passenger side off this morning and had to shake my head. PO used double sided tape to "affix" the back of the trim to the body. This resulted in it coming loose easily, which lead to scratching the paint and rubbing some areas of paint straight away. So absolutely frustrating. If you're going to go to the trouble, why not do it right?
I have new clips to replace the missing clips that go in the body. I pried the white fasteners off trim at the JY that I will glue on to my trim where they are missing. Then I should hopefully be able to reinstall it THE CORRECT WAY. Sheesh
'04 330i ZHP sedan | Mystic blue | Alcantara | 6MT | 111k
'98 740il | Schwartz 2 | Sandbeige | 5AT | 238k | lowered on Bilsteins w/ B&G springs
'00 540i sport | Titanium silver | Black | 5AT | 120k
'85 Mustang GT convertible | Medium charcoal metallic | Gray | 5MT | 215k | one owner, all original
 Boss
Boss
A bit of work going on there. Re: trim... not a bad idea to glue as a temp fix, but keep your eye on part outs on e46fanatics and maybe you can get that trim piece cheaper down the line.
Randeaux/Rando/John/jr - '06 Cic ZHP; Southern California
"ZHP or not, I still like you"
ZHP Performance Package, Cold Weather Package, Leather, Jet Black/Black/BlackCube, NAV, Anthracite Black "my individual" interior trim
ESS Stage 1 Twin Screw Supercharger, Sprint Booster, BMW Perf Intake, Magnaflow Exhaust, Dinan TB & STEP S/W, UCC Sway Bars, Apex EC-7 18x8.5 ET38
Suspension: AST 44100 dampers, Bimmerworld front adjustable end links, Swift springs (8K front, 10K rear), Vorshlag camber plates
Dynavin D99+, Hardwire V1 (w/V1 Connection), BSW Stage 1 Speakers, Kicker Amp/Subwoofer
BMW Performance Strut Brace, Orion V2 Angel Eyes, No-holes License Plate, SMG Paddle Shift Mod, Besian VANOS, Gold DISA, Fan Delete, M3 Side Mirrors
Note: Actual car no longer resembles signature picture
Big Earner
Self leveling happens at startup (at least in my coupe). I can watch the DRL's level on my garage wall or the headlights if I left them on auto.
Enforcer
I pried some old clips off some chrome trim in the junkyard. I'm going to glue the clips back on my trim to get it to sit right. Hopefully.Originally Posted by johnrando

That's what I thought. It doesn't do that. Neither light. The linkage on the control arm is there and hooked up. Where would you look first? I doubt both headlights are bad. Maybe the actuator on the control arm. I'll see if I can pull some codes from the leveling module.
'04 330i ZHP sedan | Mystic blue | Alcantara | 6MT | 111k
'98 740il | Schwartz 2 | Sandbeige | 5AT | 238k | lowered on Bilsteins w/ B&G springs
'00 540i sport | Titanium silver | Black | 5AT | 120k
'85 Mustang GT convertible | Medium charcoal metallic | Gray | 5MT | 215k | one owner, all original
Big Earner
Did you code the auto leveling lights in PA Soft? Was this a retrofit or fixing what was already there? Can I scroll up and find this out? Probably
Enforcer
Lol. Same lights that came on the car. No retrofit. I only replaced the burned bowls. I'll have to hook up INPA and look up codes.
'04 330i ZHP sedan | Mystic blue | Alcantara | 6MT | 111k
'98 740il | Schwartz 2 | Sandbeige | 5AT | 238k | lowered on Bilsteins w/ B&G springs
'00 540i sport | Titanium silver | Black | 5AT | 120k
'85 Mustang GT convertible | Medium charcoal metallic | Gray | 5MT | 215k | one owner, all original
Enforcer
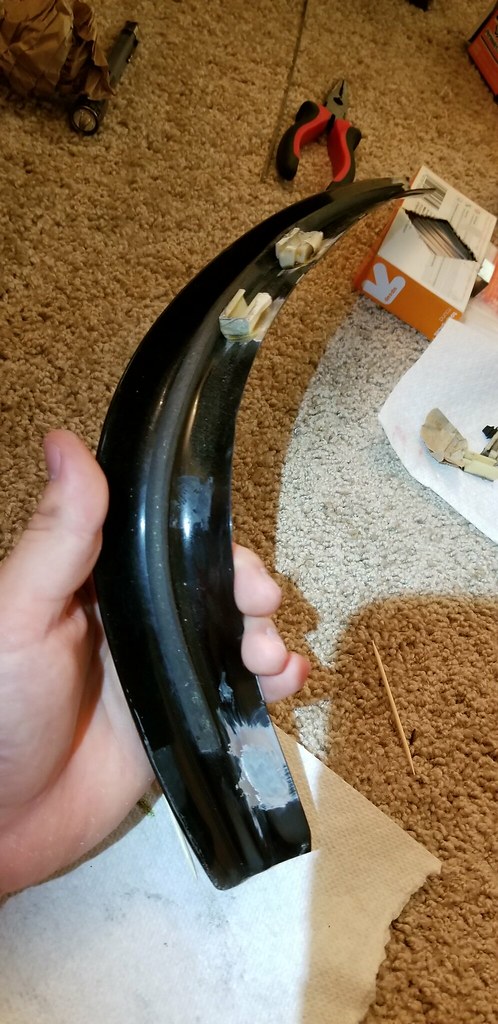
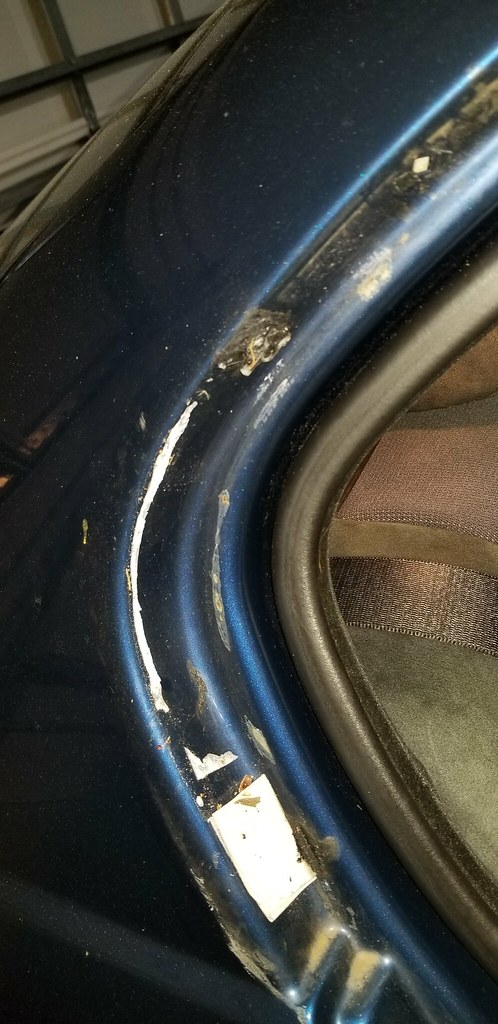
Fixed the rain gutter trim on the driver and passenger sides. Wuf, that was a bigger job than I thought. Lot of prep work.
The passenger side trim was fine up to the C-pillar. All 3 glued on clips were gone, which is why it was flapping in the wind every time the door was opened, leading to the paint scratches in the earlier pictures. When I was at the junkyard, I took the clips off the trim from a car that was there in order to glue them onto mine. It also gave the opportunity to practice taking the trim off.
It's actually surprisingly easy to get the trim off UP TO the c-pillar. The c-pillar then get's a little more technical. The key part is getting the c-pillar part off and on without breaking clips. This does a pretty good job of explaining it. Full BMW instructions here: https://www.newtis.info/tisv2/a/en/e...-strip/AzMts9D
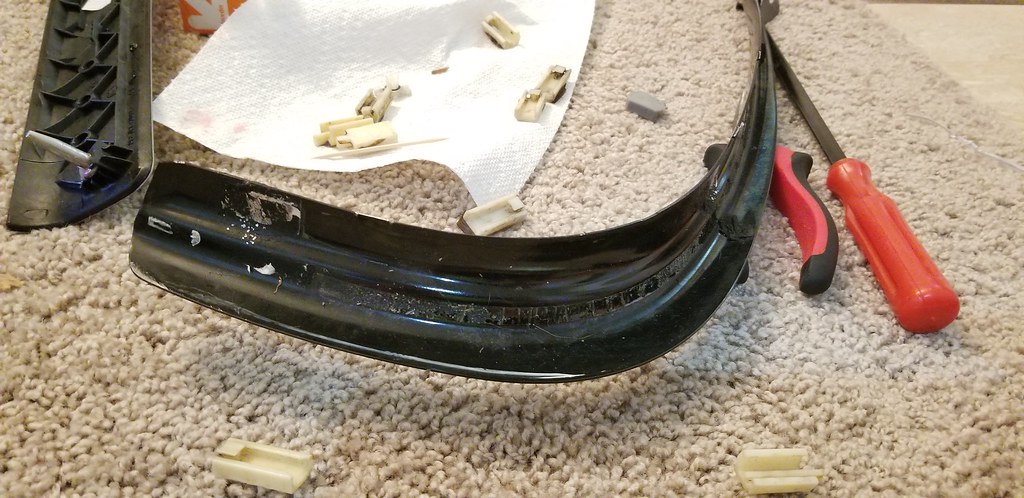
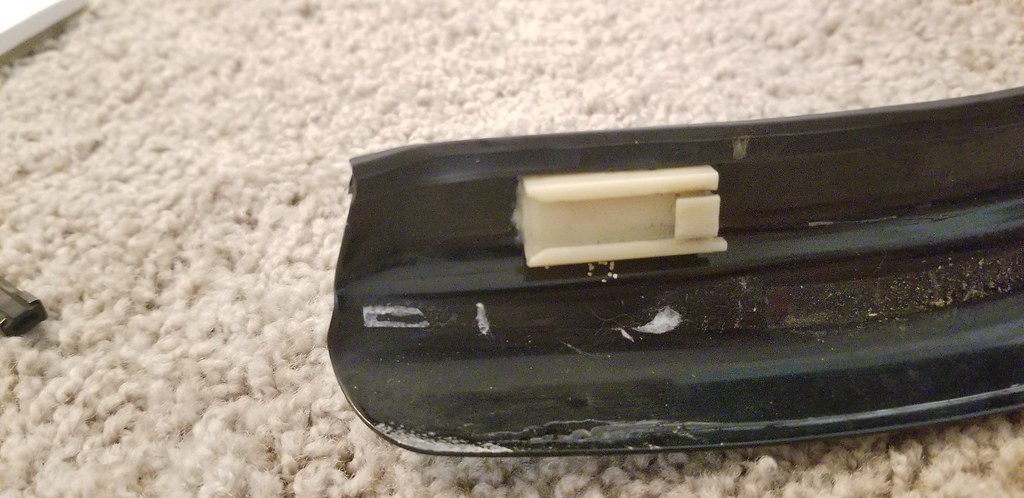
Here's how it looked when it came off, missing all 3 clips and the foam tape cushion to go against the body:
First thing was to get everything nice and clean using my trusty 3M adhesive cleaner and then etch some lines in the metal to help align the clips once the glue is on. I used one of those electric engravers I had kicking around.
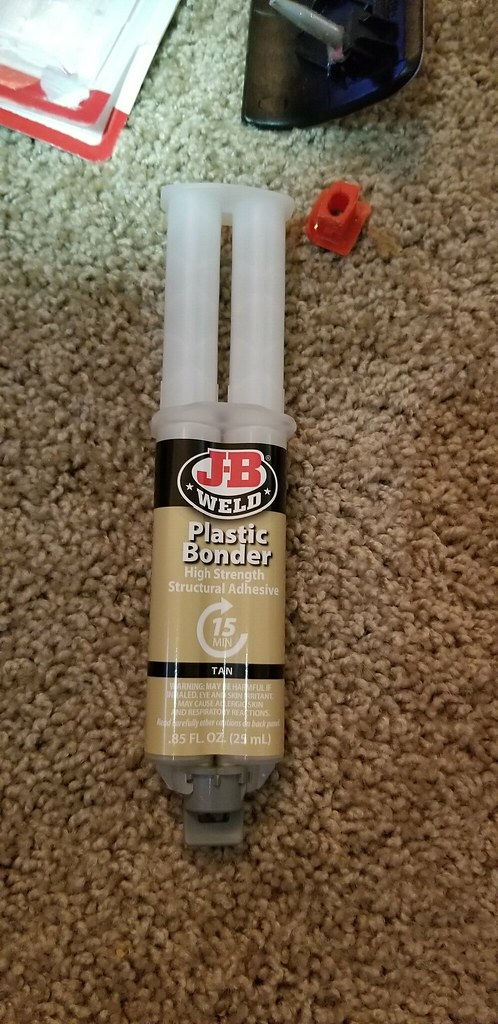
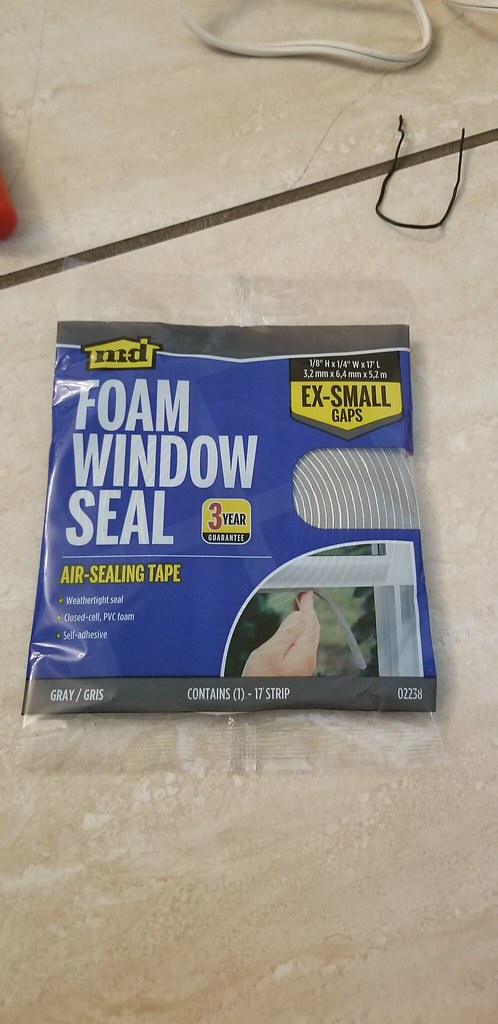
I chose this glue I found at the store. It seemed perfectly suited for my job. It bonds plastic to plastic (really good I might add) and plastic to metal.
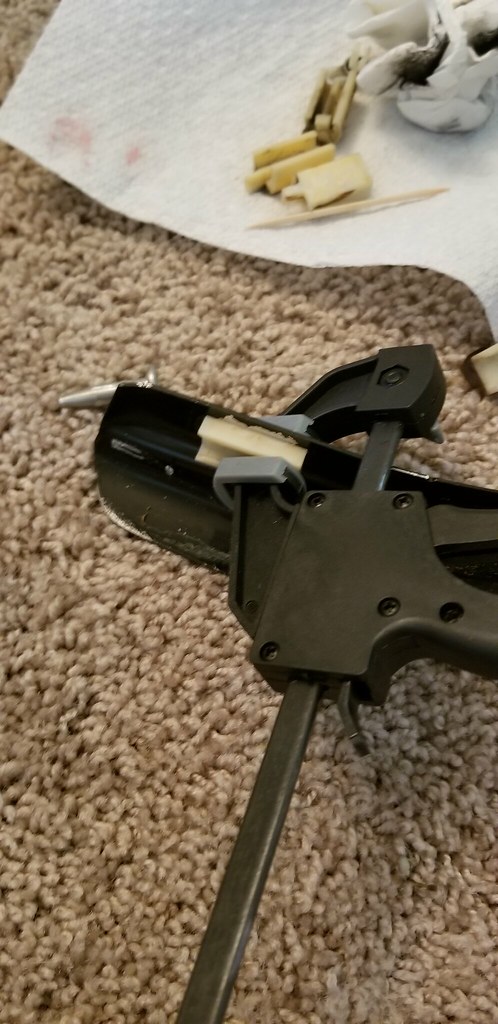
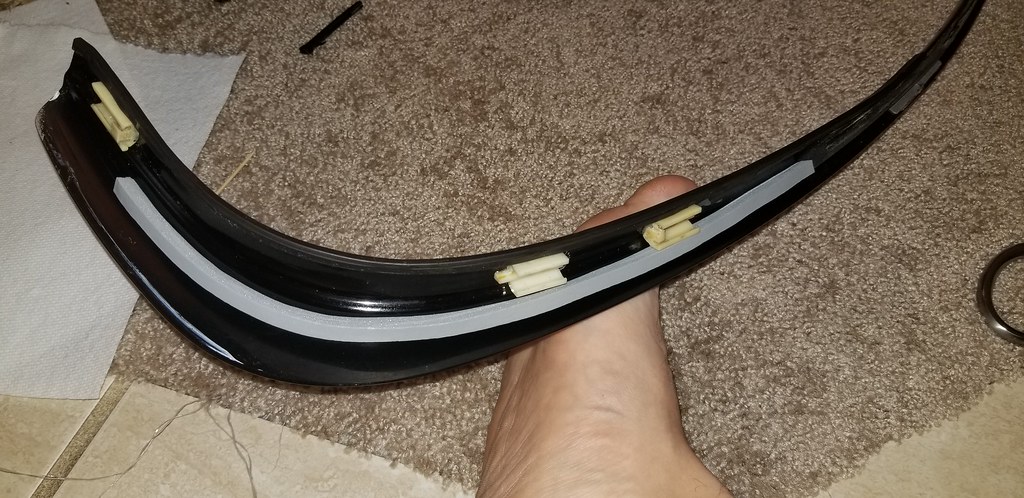
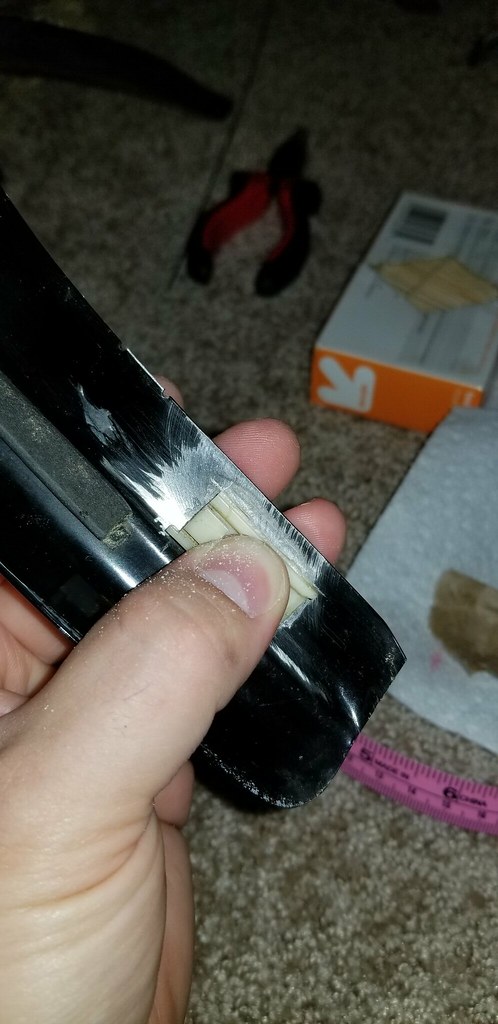
My biggest mistake, though, was not roughening the metal up. The two upper clips came off when I went to install the trim. The epoxy sticks to COATED metal, meaning epoxy coated which this is not since it is just painted, so roughening it up helps with the micromechanical retention of the glue. These next pics are the first gluing before I scuffed it with the dremel.
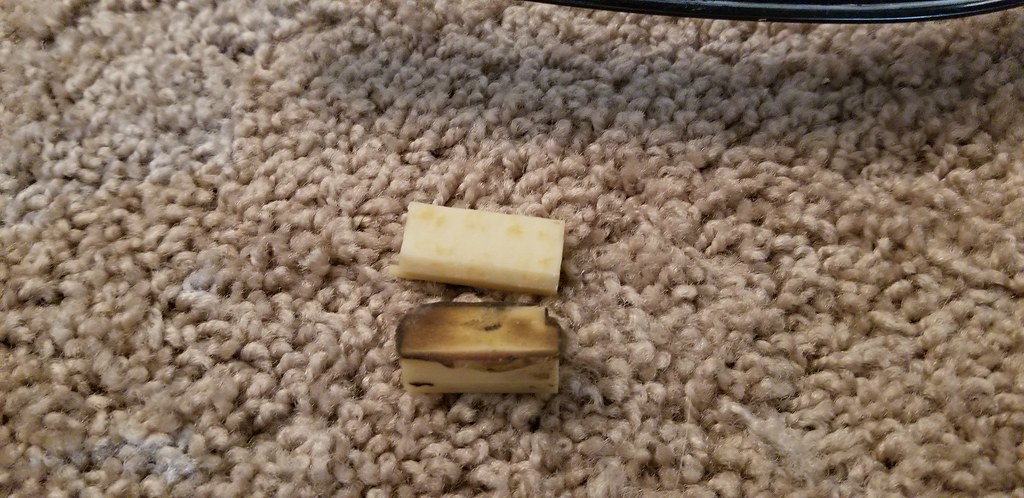
Take the dremel and clean the old glue off the clips.
Some important notes about the clips:
- The clips are right vs left! The two upper clips have a taller wall that faces the outside of the trim, so don't glue passenger side clips on the driver's side trim.
- Additionally, the upper most clip has the stop towards the bottom, whereas the lower clip has the stop towards the top. This is critical, because the lower clip stop is what lines the bottom of the c-pillar portion of the trim to the door trim and the breastwork on the quarter panel. The upper clip stop prevents the trim from sliding forward towards the front fender.
- The placement of the clips is critical. Too high or low, and the trim won't sit right. Too close to the edge and it will sit too far from the body when mounted on the car. There was a tiny bit of residual glue left on the trim that helped me pick the right position for them and then etch lines in the metal. But for future reference, I measured 10 times and the height position for the top edge of the bottom clip is 51mm from the base of the trim, measured from the first crease in the metal.
Now that the clips are on, I had to come up with a way to replace the thin rubber edging that sits on the edge of the trim on the body side. It runs from the joint where the c-pillar portion is glued to the rest of the rain gutter down to the bottom. There is no chance you find this in a store, so I cut up some old windshield wiper blades and glued them on. Not exactly like factory, but better than $420 for new trim.
Next was replacing the missing foam strip. I got the right width foam at the store, but it wasn't as thick, so I just double layered it.
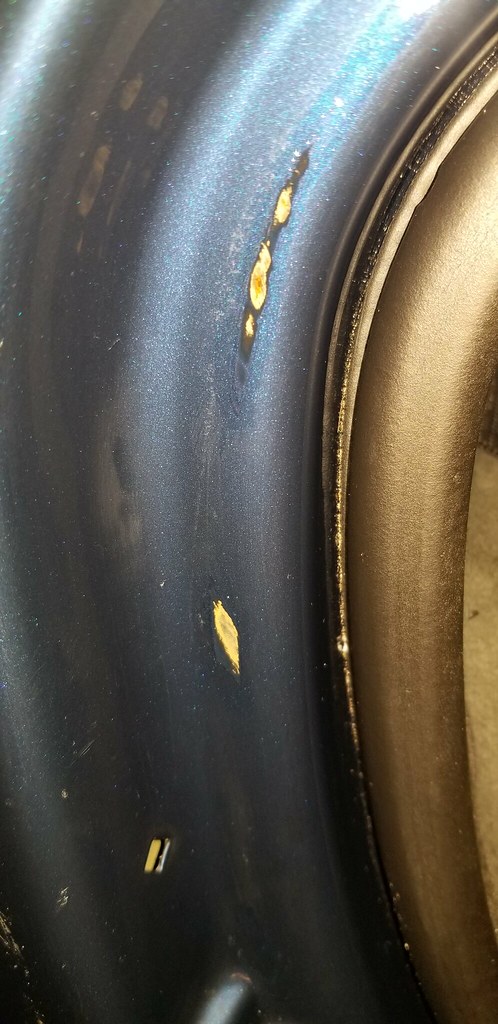
Cleaned up the area on the car. I don't have mystic blue touch up paint, but I do have jet black and clearcoat for my E38. So I cleaned the area well and coated the bare areas with the clear coat just to seal things up. This is FL, so no salt around, but just being thorough.
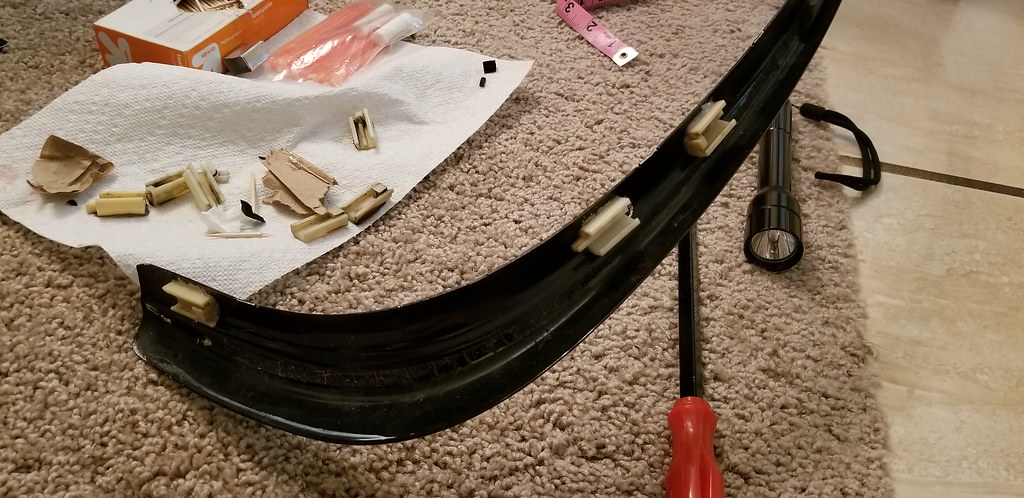
New clips on the body (pn 51138204858):
And the finished product! Note the position of the bottom of the trim. When fully slid down against the stop on the clip, it sits right at the crease in the quarter panel.
Here's the driver's side piece. The c-pillar part only had the lower clip debonded, but the clip was still on the car. The upper clip was split in half. Additionally, the C-pillar portion was separated from the rest of the rain gutter, so the two would slide apart and the rain gutter would run down into the front fender. I ended up using traditional JB weld to glue the two pieces of metal together.
But first, I had to repair the c-pillar clips. I think someone in the past tried to re-glue it with the trim still on the car because there was glue on the body, glue on the trim, and where the glue remained was not even close to where the clip should be to make the trim sit right.
Cleaned off the trim and made my alignment marks...upper line 51mm away from bottom.
No more pics of that side. I got lazy. But it's back in business!
'04 330i ZHP sedan | Mystic blue | Alcantara | 6MT | 111k
'98 740il | Schwartz 2 | Sandbeige | 5AT | 238k | lowered on Bilsteins w/ B&G springs
'00 540i sport | Titanium silver | Black | 5AT | 120k
'85 Mustang GT convertible | Medium charcoal metallic | Gray | 5MT | 215k | one owner, all original
Enforcer
I need to do this. Expect a PM from me later tonight. You seem to have it well sorted haha
Sent from my SM-N960F using Tapatalk
'03 325i 6MT Individual - Estoril Blue
Boss
Nice werk
Sent from my SM-G955U using Tapatalk
Randeaux/Rando/John/jr - '06 Cic ZHP; Southern California
"ZHP or not, I still like you"
ZHP Performance Package, Cold Weather Package, Leather, Jet Black/Black/BlackCube, NAV, Anthracite Black "my individual" interior trim
ESS Stage 1 Twin Screw Supercharger, Sprint Booster, BMW Perf Intake, Magnaflow Exhaust, Dinan TB & STEP S/W, UCC Sway Bars, Apex EC-7 18x8.5 ET38
Suspension: AST 44100 dampers, Bimmerworld front adjustable end links, Swift springs (8K front, 10K rear), Vorshlag camber plates
Dynavin D99+, Hardwire V1 (w/V1 Connection), BSW Stage 1 Speakers, Kicker Amp/Subwoofer
BMW Performance Strut Brace, Orion V2 Angel Eyes, No-holes License Plate, SMG Paddle Shift Mod, Besian VANOS, Gold DISA, Fan Delete, M3 Side Mirrors
Note: Actual car no longer resembles signature picture
 Posting Permissions


 Reply With Quote