Materials to Maintain Your ZHP IIIII Hand Protection IIIII Tools to Maintain Your ZHP
Page 6 of 9 FirstFirst ... 45678 ... LastLast
Results 51 to 60 of 88
  1. #51
    Join Date
    Jun 2012
    Location
    Socal
    Posts
    1,739
    (4/18/2020)

    Did this like a couple of days ago. But since covid19, no car and nothing to do, I made this :


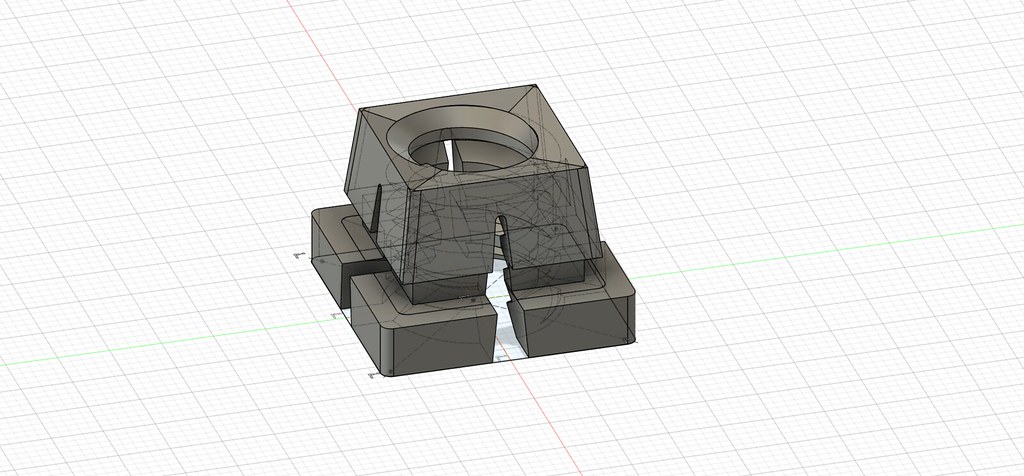
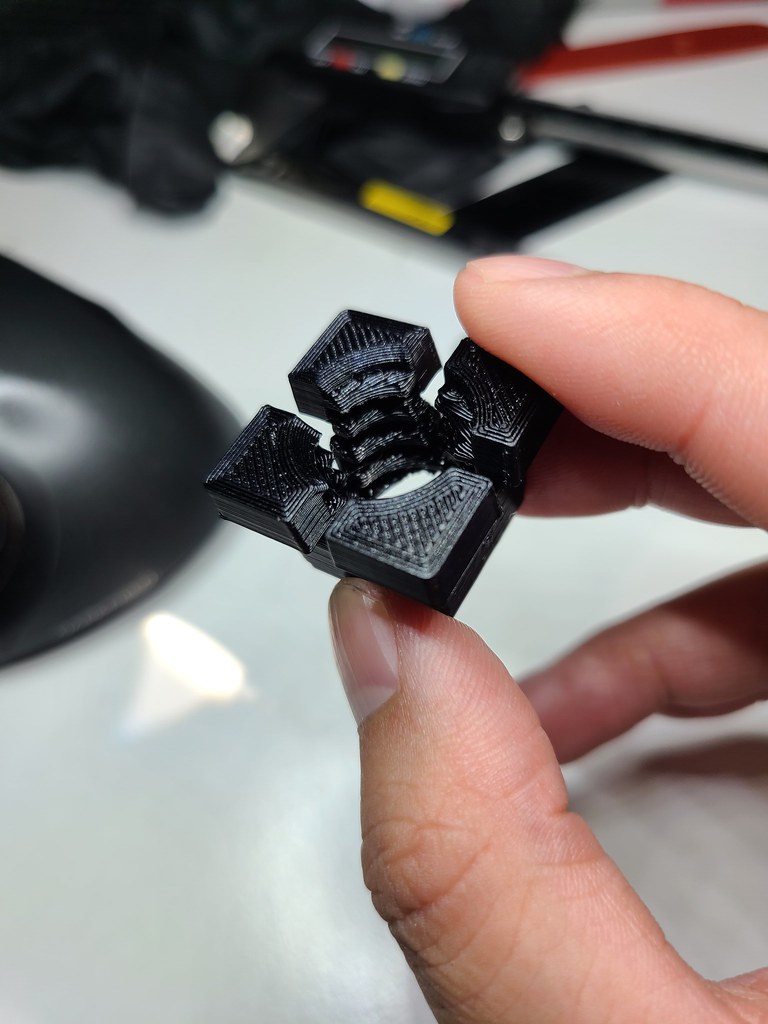
    It's the trunk tool screw holder thing. My tool box keeps falling off cause the groove in the piece is too small for the thickness of the fiberglass on my CSL trunk. So I just made this and made the groove larger lol I don't have my car to test yet, but at least I got the basic shape and thread sizing down. It'll only take seconds to adjust the groove size and like an hour to print another one if it doesn't fit.

    I actually made a few things, but this was the only e46 specific thing. I made a Pi Zero W case the other day. Making a letter opener today :

  2. #52
    Join Date
    Jun 2012
    Location
    Socal
    Posts
    1,739
    And finally, to the post that I wanted to post in the first place lol


    Covid19 Project 12? Iono, I keep jumping through them to cure my boredom.

    So I started working on other parts of the car that I was too lazy to do. Since there's nothing to do since the pandemic, I might as well do it now, cause I'll have to do it later.

    Anyways, I've had these Morimoto LED fog lights since they were first released. I never installed it lol I did, however, put them on JR's car to test if they work. They did, then sat in the box they came in for like iono 2 years? Well it's time to modify them.

    The one thing I don't like about the LED fog lights is that it doesn't look OEM when installed. I bought them anyways cause I knew I would fix it later :lmao:. The main reason I didn't like how it looked? It was because it didn't have the glass covering them. They look just like how the projector fogs looked pretty much. I ran that set up already and didn't exactly like the look then either. Output looks good, but when I look at the car with them off, it's eh.

    So my solution :? Combine the two lol Originally, I set out to just put the innards of the LED fogs into the OE fog light housings. But they were such a bitch to get out. I was trying to remove the LEDs without destroying the original housing in case it didn't work in the fog lights. It was pretty much impossible. So onto my next solution. I just bought some aftermarket fog light housings for $35. Then I'm going to remove the glass off that.

    Got the aftermarket fog light here:


    LED:


    Originally, I was going to just try to take the glass without cutting the housing. But it's held with black silicone. It doesn't really respond to heat well. You pretty much have to cut it with a knife. The glass has a lip that goes down, so while I can cut the silicone on the outside, I can't go any deeper. So fuck it, I'll just destroy them to get to what I want. :

    Taped up, just in case before I go to Dremel them:


    Glass off the housing:


    Now to cut off the plastic part so I only get the glass. It wasn't too bad. Got a new cutoff wheel and made my first couple of cuts to see how far I can go before I hit the glass. Once you determine that, the rest of the cuts was easy.


    Cleaned up all the remaining silicone and then test fit:


    It looks like it was meant to be there :hmm:

    Next step was to figure out how to plug up some of the holes so I don't get too much fogging when it rains and stuff. For the most part, the LED fogs are weatherproof. Originally, I was going to try to use an o-ring or something to plug the gaps. But there were too many gaps since this housing is like an open piece. So I just decided to stick some desiccant inside where you can't really see it. Good enough. If it becomes a problem, I'll revisit this.


    I was going to just use black silicone to glue up everything as that is what was used before. Even the OE ones. But I decided to go with the black butyl headlight sealant instead. The one where you need to bake to make it soft. One reason was so that if the glass breaks/cracks later down the line, I can just replace them using the same method. Same with the LEDs ever failing. I can just take the glass off and transplant them on the new one. It'll save me a lot of time later lol

    Normally, I would use a single continuous strand. But since I couldn't get my fingers in some parts of the fog light to massage it so that it can stick and spread around, I had to break it up into a couple sections.


    Ready to bake:


    I didn't end up baking it. I just hit it with a heat gun. I wasn't sure if the LED could handle the heat.

    All done. As OEM as I could get it. The edges having glue stick out in globs doesn't matter tbh. It'll get covered up by the fog light trim:


    Obviously not the best pictures. But I dropped by the body shop to do a test fit to see how it would look. Looks exactly like how I imagined it would look.

    OE:


    LED:


    I wrapped it in Xpel, but shit was hard lol Didn't come out right. I guess I'll do it again later or something.

    I can already tell that adjusting it will be a bitch to do with how it's designed. I plan to test on JR's car again. Probably do the adjustments on his car too.

    It took me like 2 weeks. But, you could finish this whole project in like half a day if you had all the parts for anyone wanting to do it. I wasted a lot of time trying to do shit the hard way. : Then more time waiting for stuff to come in from amazon with their non-existent prime shipping currently.

  3. #53
    Join Date
    Jun 2012
    Location
    Socal
    Posts
    1,739
    Ok, I managed to post everything without accidentally skipping a post lol Also, no one interrupted me. Stupid 30 second between posts. Could have done it way faster lol

    Also, looking through my thread. I forgot that even when I had projector fog lights. I retrofitted them so that they could be behind the glass too
    Last edited by sillieidiot; 05-17-2020 at 01:18 AM.

  4. #54
    Join Date
    Jan 1970
    Location
    Lexington, KY
    Posts
    4,922
    Great read! Thanks for transferring all here. Having a lift at home must be great.
    325i, 2005, 5MT, Silvergrey, leatherette, Sport package; CDV delete, KONI STR-T & KYB Excel-G, Weisslichts, Stewart H2O pump

    328i, 2010, 6MT, Spacegrey, dakota leather, M-sport packages; has a 330 intake but no tune - yet
    http://s900.photobucket.com/user/othibau/media/Junesig.jpg.html][IMG]http://i900.photobucket.com/albums/ac208/othibau/Junesig.jpg

  5. #55
    Join Date
    May 2020
    Location
    SF Bay, CA
    Posts
    1,266
    Lol don't tell me you pulled your car outside while it was missing one of the rear quarters
    2004 BMW 330CI ZHP (well, technically ZAM)


  6. #56
    Join Date
    Jun 2012
    Location
    Socal
    Posts
    1,739
    Quote Originally Posted by Oli77 View Post
    Great read! Thanks for transferring all here. Having a lift at home must be great.
    Yeah, it definitely helps. I did everything before on other people's cars and it was a bitch. Then when I went back to do stuff on my car with the lift, I"m always like, it's not as bad as I remembered lol Like the SSK. Man that was a PIA on jack stands.

    It's been at JRs place just sitting there though lol We might actually get to install it soon.

    Quote Originally Posted by t.er View Post
    Lol don't tell me you pulled your car outside while it was missing one of the rear quarters
    Nah, the car was already outside for some reason. That's why the picture sucked. It was right up against the fence, so I had to try to take the picture as far away as possible. I couldn't get the whole front bumper even with the ultrawide angle lens.

  7. #57
    Join Date
    Jan 1970
    Location
    Southern California
    Posts
    18,064
    Finally!

    Sent from my SM-G988U using Tapatalk
    Randeaux/Rando/John/jr - '06 Cic ZHP; Southern California
    "ZHP or not, I still like you"


    ZHP Performance Package, Cold Weather Package, Leather, Jet Black/Black/BlackCube, NAV, Anthracite Black "my individual" interior trim
    ESS Stage 1 Twin Screw Supercharger, Sprint Booster, BMW Perf Intake, Magnaflow Exhaust, Dinan TB & STEP S/W, UCC Sway Bars, Apex EC-7 18x8.5 ET38
    Suspension: AST 44100 dampers, Bimmerworld front adjustable end links, Swift springs (8K front, 10K rear), Vorshlag camber plates
    Dynavin D99+, Hardwire V1 (w/V1 Connection), BSW Stage 1 Speakers, Kicker Amp/Subwoofer
    BMW Performance Strut Brace, Orion V2 Angel Eyes, No-holes License Plate, SMG Paddle Shift Mod, Besian VANOS, Gold DISA, Fan Delete, M3 Side Mirrors
    Note: Actual car no longer resembles signature picture

  8. #58
    Join Date
    Mar 2011
    Location
    Independence KY
    Posts
    2,832
    Do you have a link for the company that produces the CF interior trim and tool shell on the trunk?
    2005 BMW 330i ZHP - BMWP brakes/intake/strut bar/shifter, Coby wraps interior, BBS CHs, Eagle Eye LED tails, LED fog lights, GC coilovers, Sprint Booster/sport button mod, 4.5 LCM w/ programming, Xtrons 9inch HU, BSW stg1, dynamat, M3 sedan dead pedal, oCarbon CF interior trim, CF seat backs, 2x2 CF MTECH2 diffuser, CF cabin filter cover


  9. #59
    Join Date
    Jun 2012
    Location
    Socal
    Posts
    1,739
    Quote Originally Posted by BADCLOWN View Post
    Do you have a link for the company that produces the CF interior trim and tool shell on the trunk?
    Nah, it used to be an EAS product. It was discontinued way back when I got it I think.

  10. #60
    Join Date
    Mar 2011
    Location
    Independence KY
    Posts
    2,832
    Bummer, thanks though. Very cool build, can’t wait to see the charger on. I think that’s going to be my next step as well but going the VF route
    2005 BMW 330i ZHP - BMWP brakes/intake/strut bar/shifter, Coby wraps interior, BBS CHs, Eagle Eye LED tails, LED fog lights, GC coilovers, Sprint Booster/sport button mod, 4.5 LCM w/ programming, Xtrons 9inch HU, BSW stg1, dynamat, M3 sedan dead pedal, oCarbon CF interior trim, CF seat backs, 2x2 CF MTECH2 diffuser, CF cabin filter cover


Page 6 of 9 FirstFirst ... 45678 ... LastLast

Similar Threads

  1. The Clown is Back: Progress thread
    By BADCLOWN in forum Projects
    Replies: 637
    Last Post: 05-25-2023, 05:59 AM
  2. Sillieidiot's...er...SamBam's M240i progress thread
    By sillieidiot in forum Projects
    Replies: 49
    Last Post: 03-21-2022, 04:16 PM
  3. Replies: 366
    Last Post: 09-18-2018, 04:48 AM
  4. Pokes 04 AW Sedan Progress/Maintenance Thread
    By poke08 in forum Projects
    Replies: 43
    Last Post: 08-11-2015, 02:21 PM
  5. Stav's 330 N/A Progress Thread. Part 2.
    By Secono330ci in forum Projects
    Replies: 4
    Last Post: 04-24-2015, 10:32 AM

Tags for this Thread

Posting Permissions

  • You may not post new threads
  • You may not post replies
  • You may not post attachments
  • You may not edit your posts
  •