Materials to Maintain Your ZHP IIIII Hand Protection IIIII Tools to Maintain Your ZHP
Results 1 to 6 of 6
  1. #1
    Join Date
    Jan 1970
    Location
    Liberty Township, OH
    Posts
    37,935

    BMW E46 Radiator DIY doityourself

    Time elapsed: 2 hours including bleed.

    Tools: T25 Torx, Standard Screw Driver, Philips Head Screwdriver.

    Materials: 1 gallon BMW coolant. 1 gallon distilled water. Behr Radiator. Cooling overhaul kit recommended.

    The DIY for this isn't that simple to write. A lot of it is "by feel" when fitting the radiator into the proper position.

    Once it's in the proper position Hang the expansion tank and frame on the radiator and secure with 2 screws. Understand that these "2 screws" are the same two screws that we always take off when removing the aux pusher fan.

    NOTE: THE BENTLEY MANUAL IS WRONG. IT TELLS YOU TO REMOVE 2 SCREWS. THE TWO SCREWS THE BOOK POINTS TO, ACTUALLY ARE FOR THE AC CONDENSER, NOT THE RADIATOR.
    Pics provided below will help you identify the mount points.
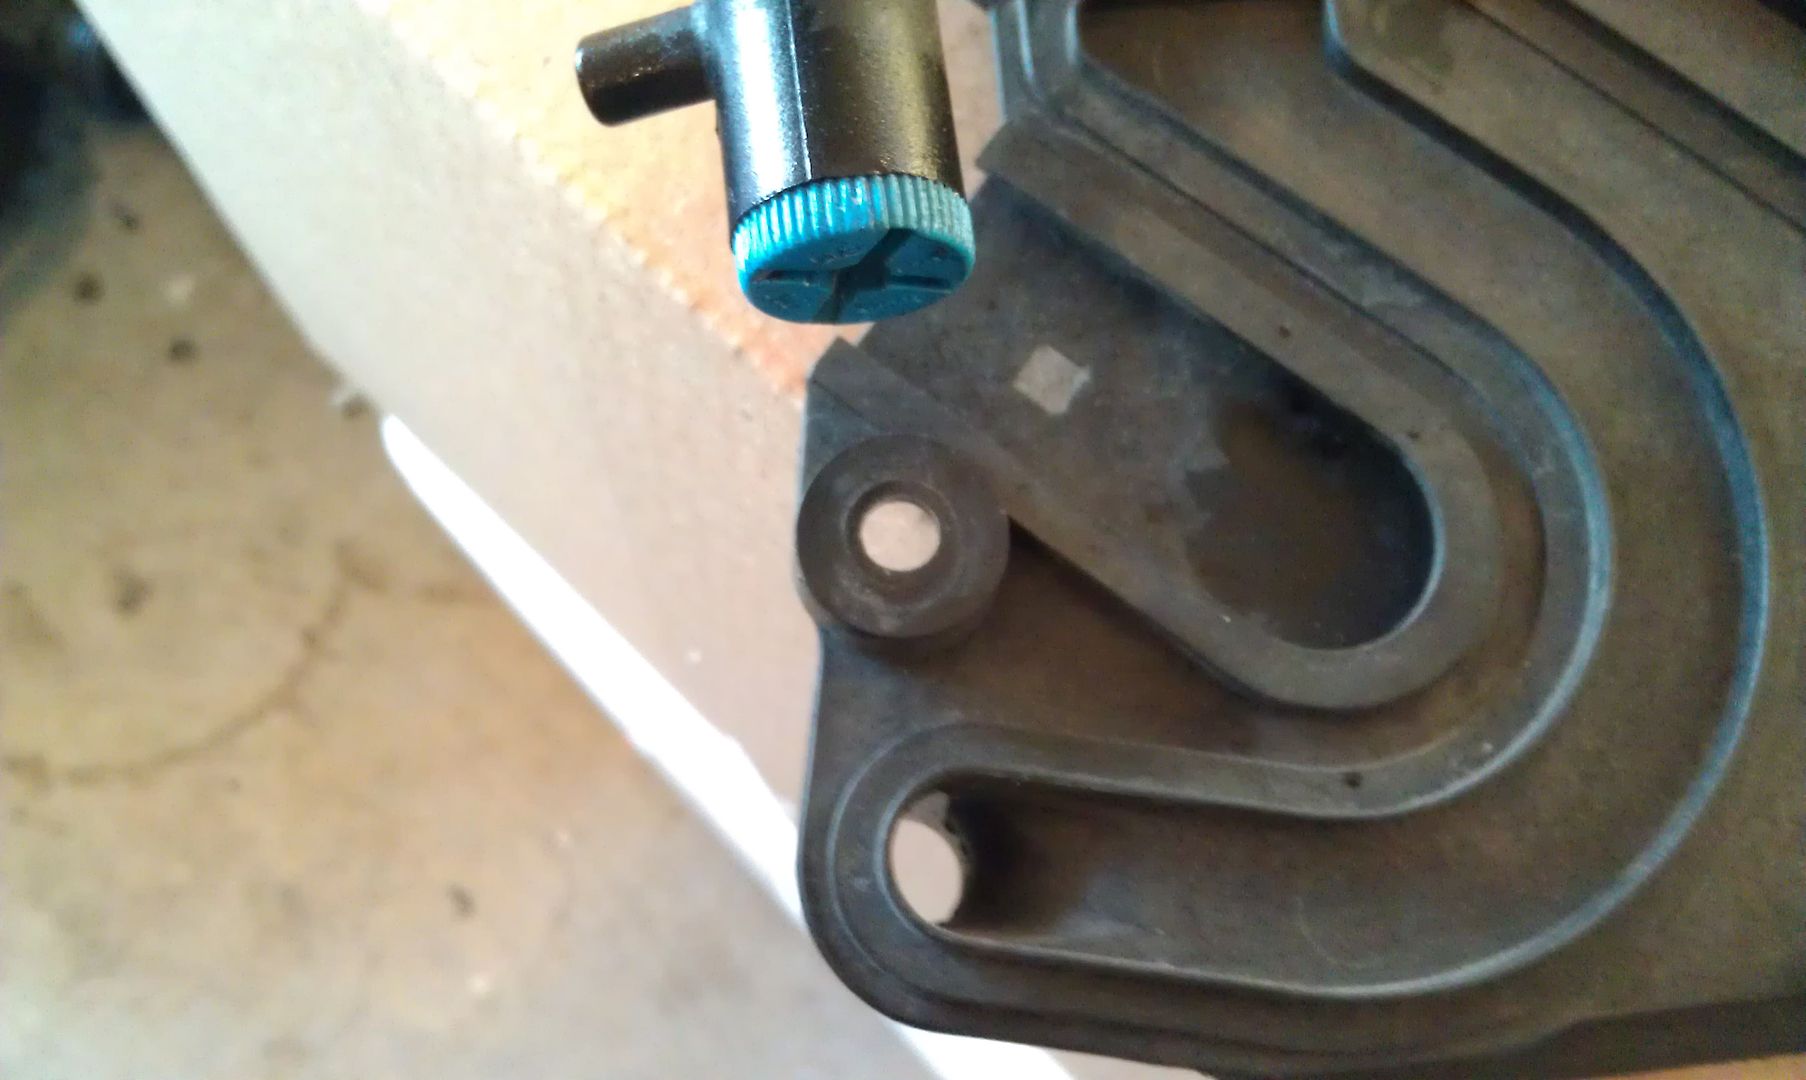
    STEP 1.

    You're going to have to lower the radiator, down into the engine bay. I had my son under the engine bay, to ensure everything went in smooth, and the mount points...on the way down....meshed.

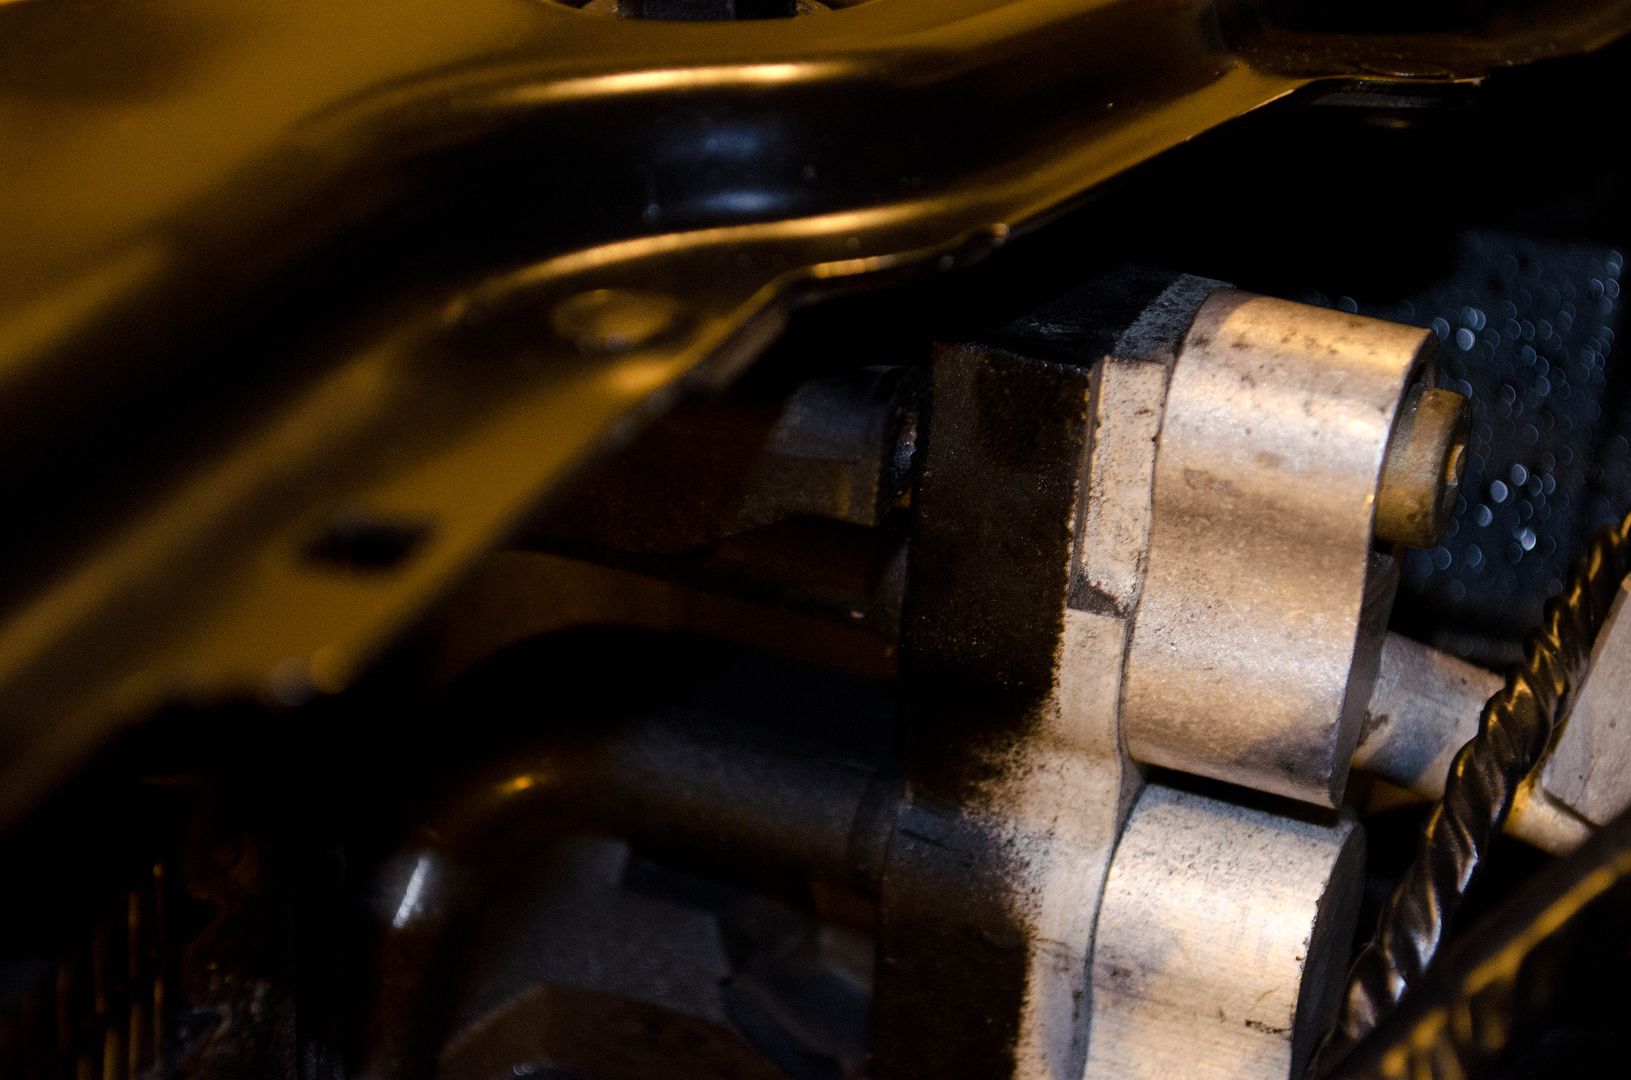
    Radiator Mount point foot drivers side


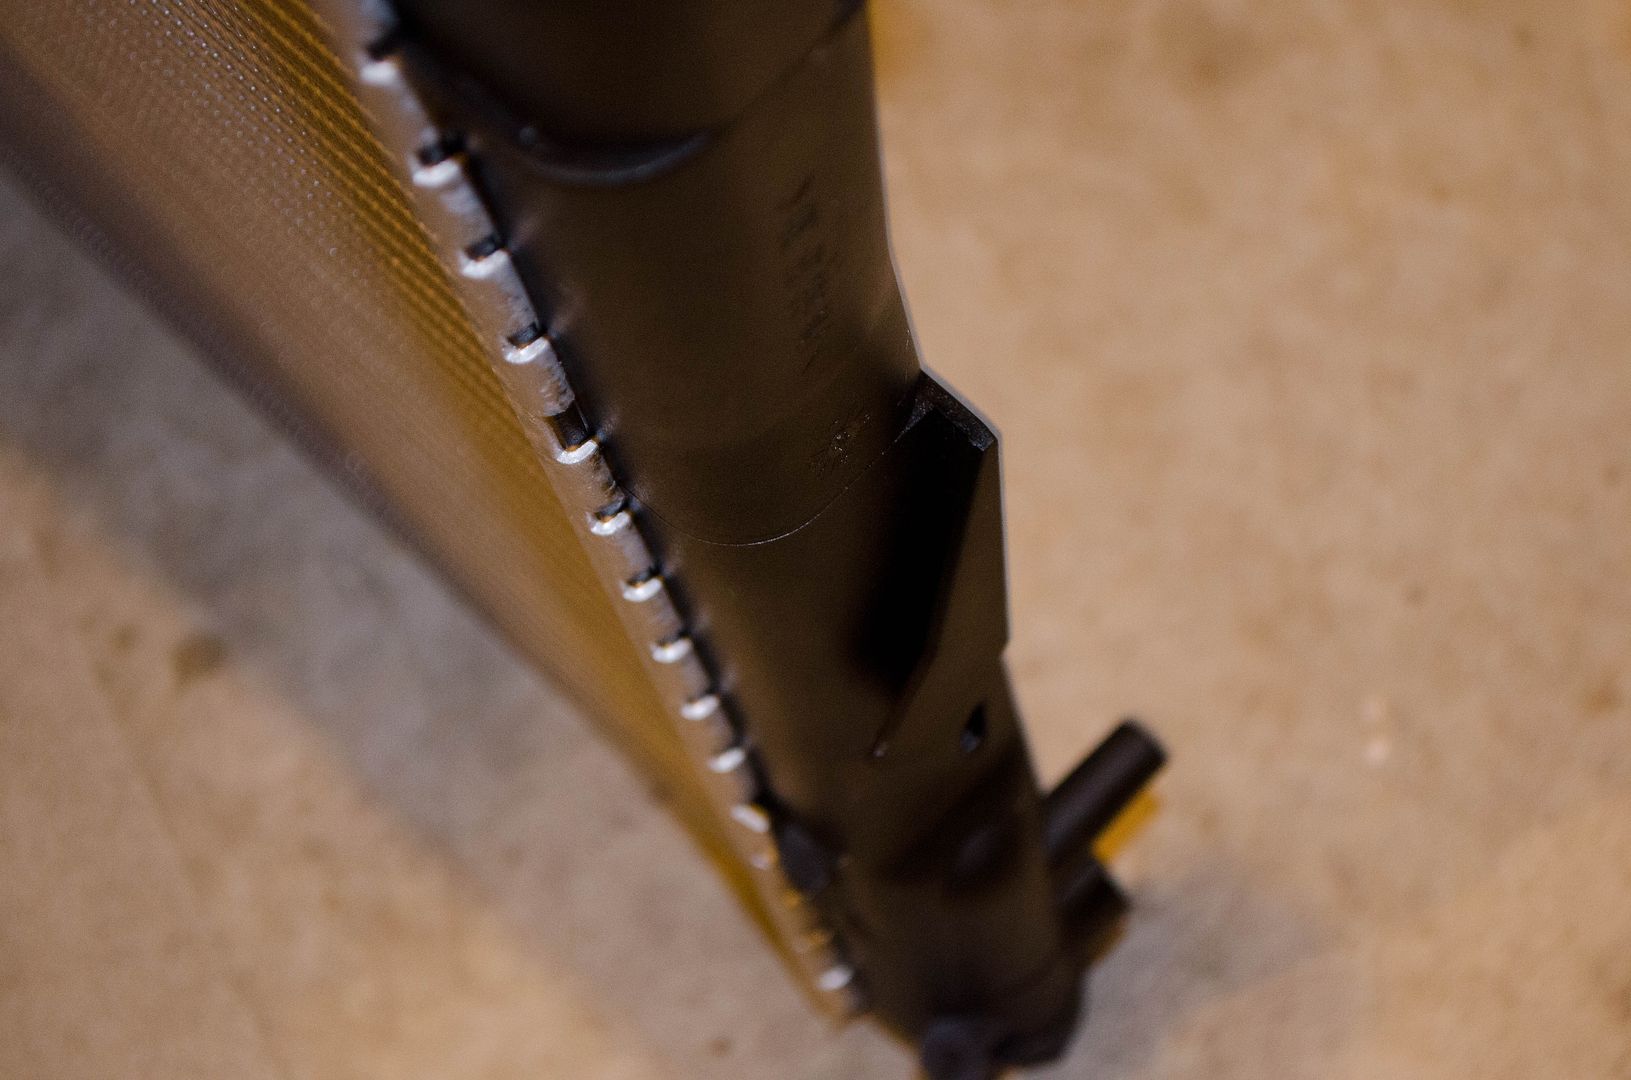
    Radiator Mount point foot passenger side
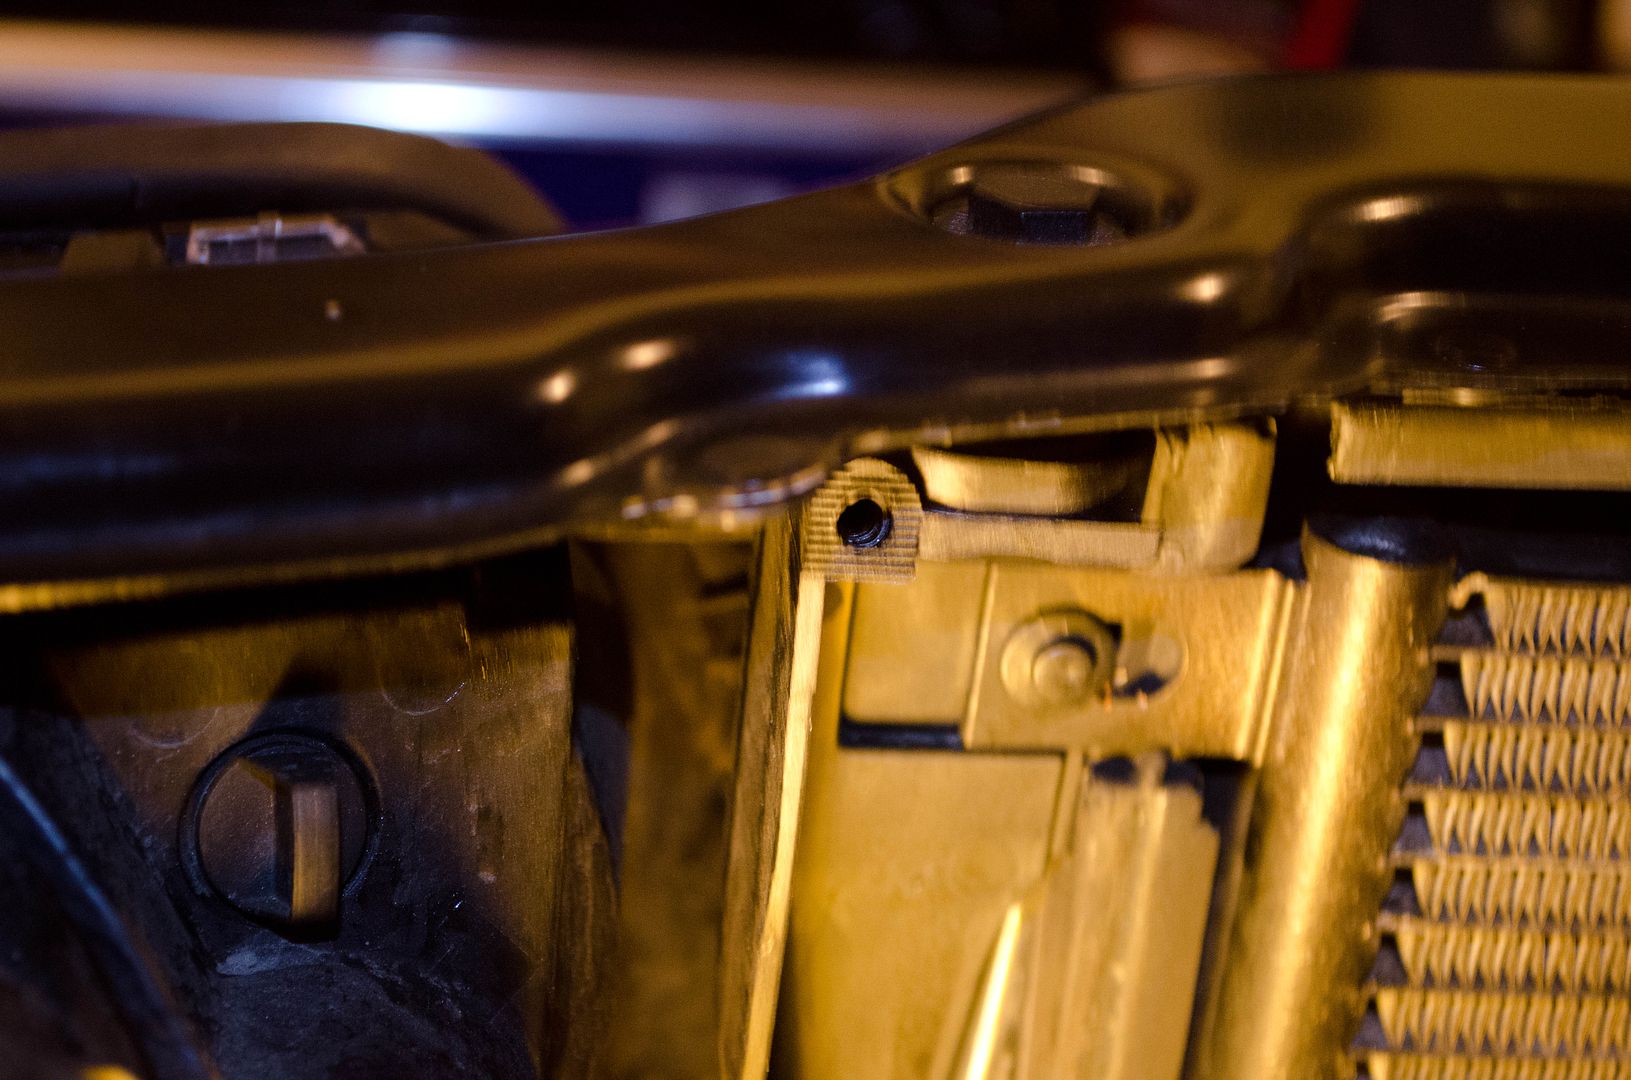


    STEP 2.

    Once you have the radiator lowered and aligned properly....the two holes at the top of the radiator will line up perfectly. Mount point shown below:

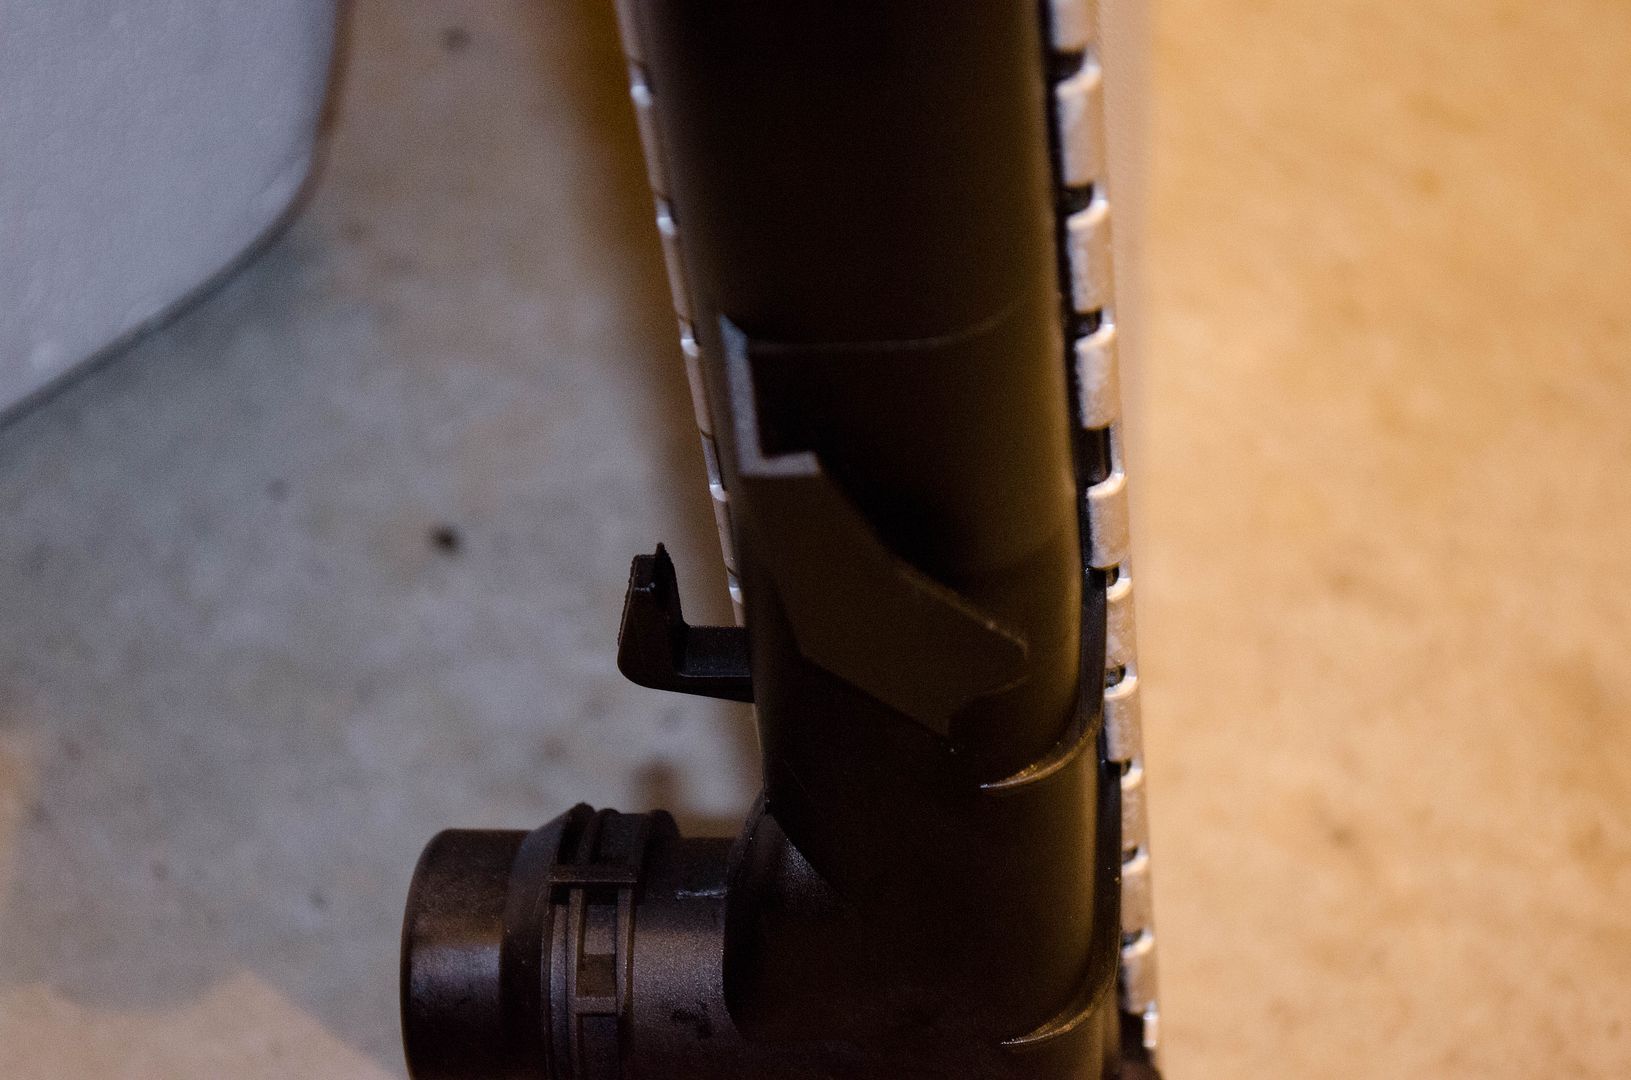
    Radiator Top Mount point drivers side


    The above point matches up to the point below


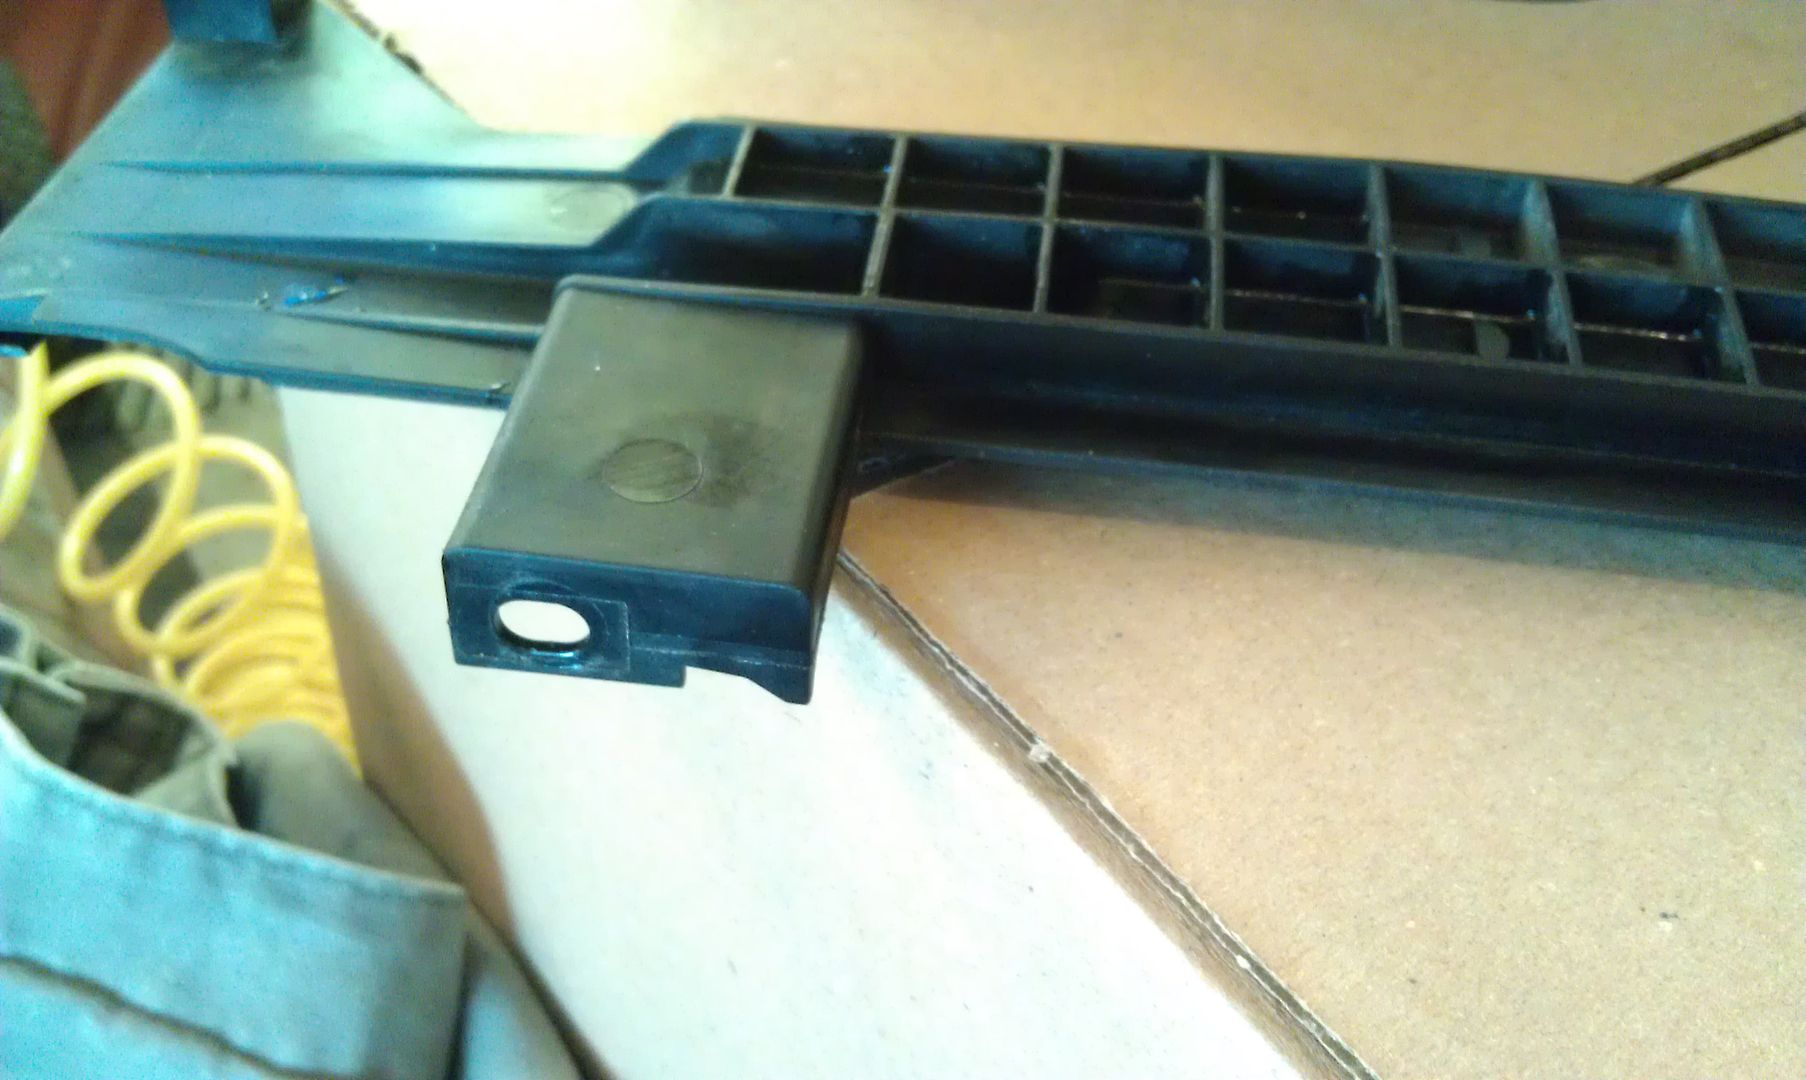
    Radiator Top Mount point passenger side


    The above point matches up to the point below


    STEP 3.

    *Do not fasten the top two points...as the aux pusher fan needs to be installed beforehand*


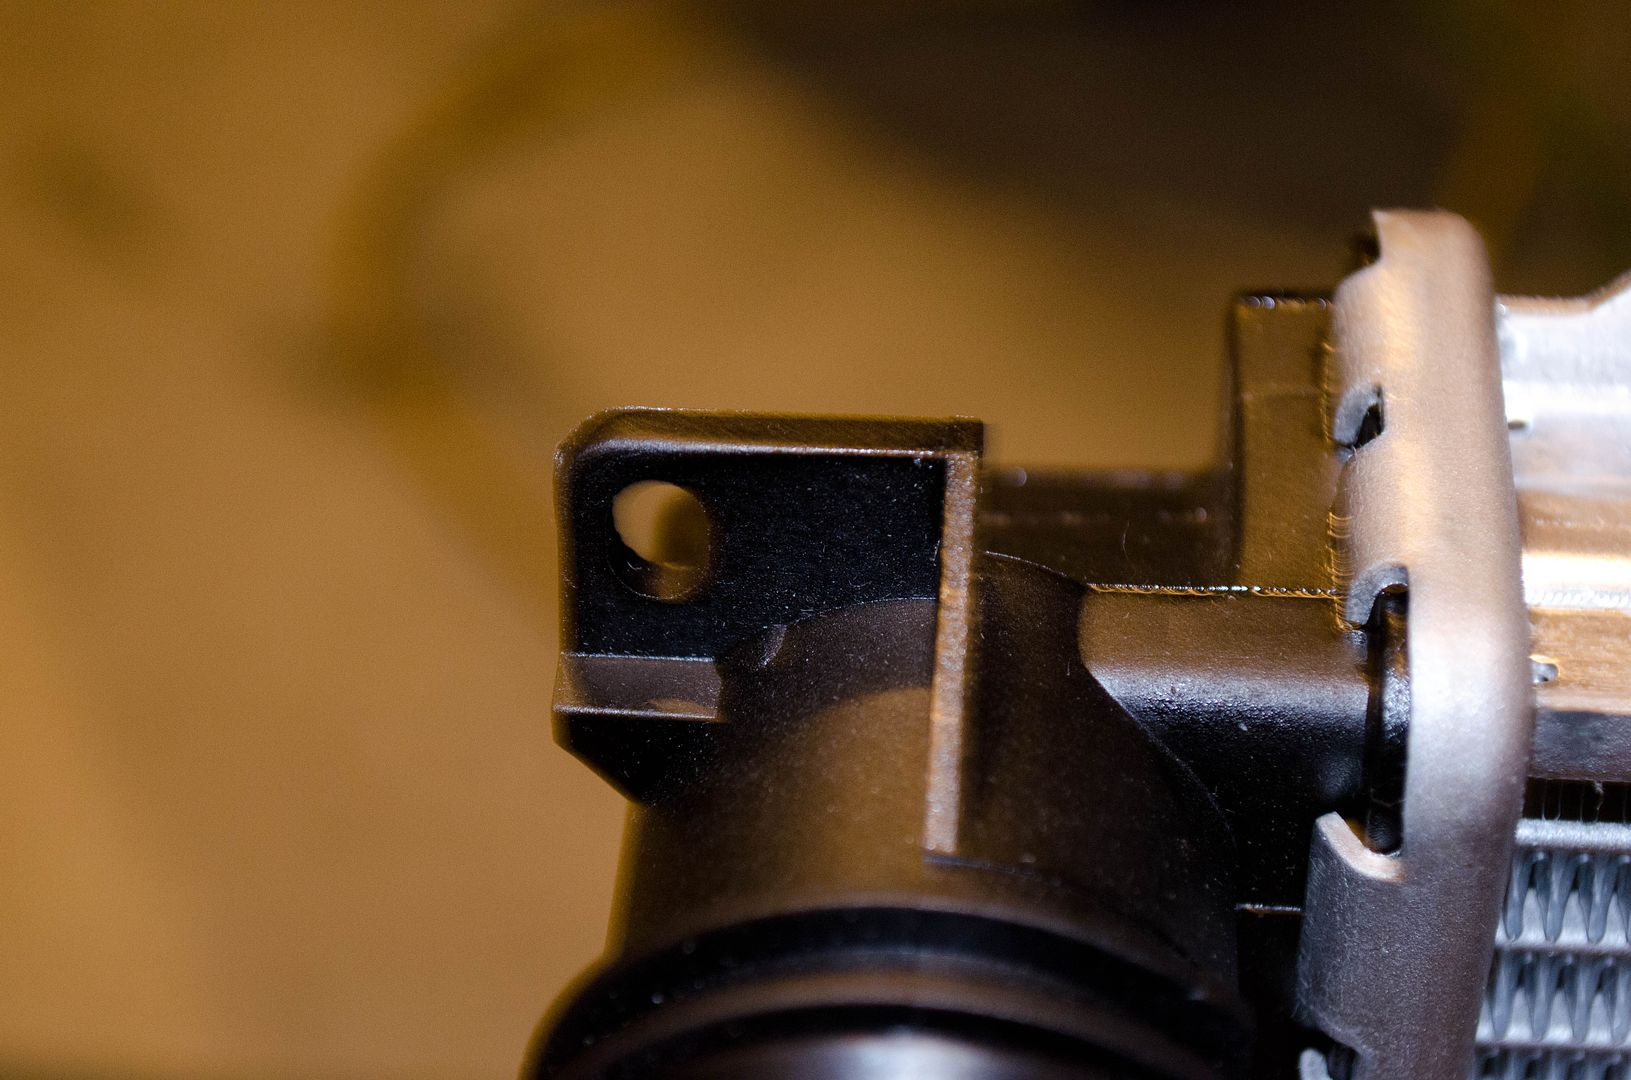
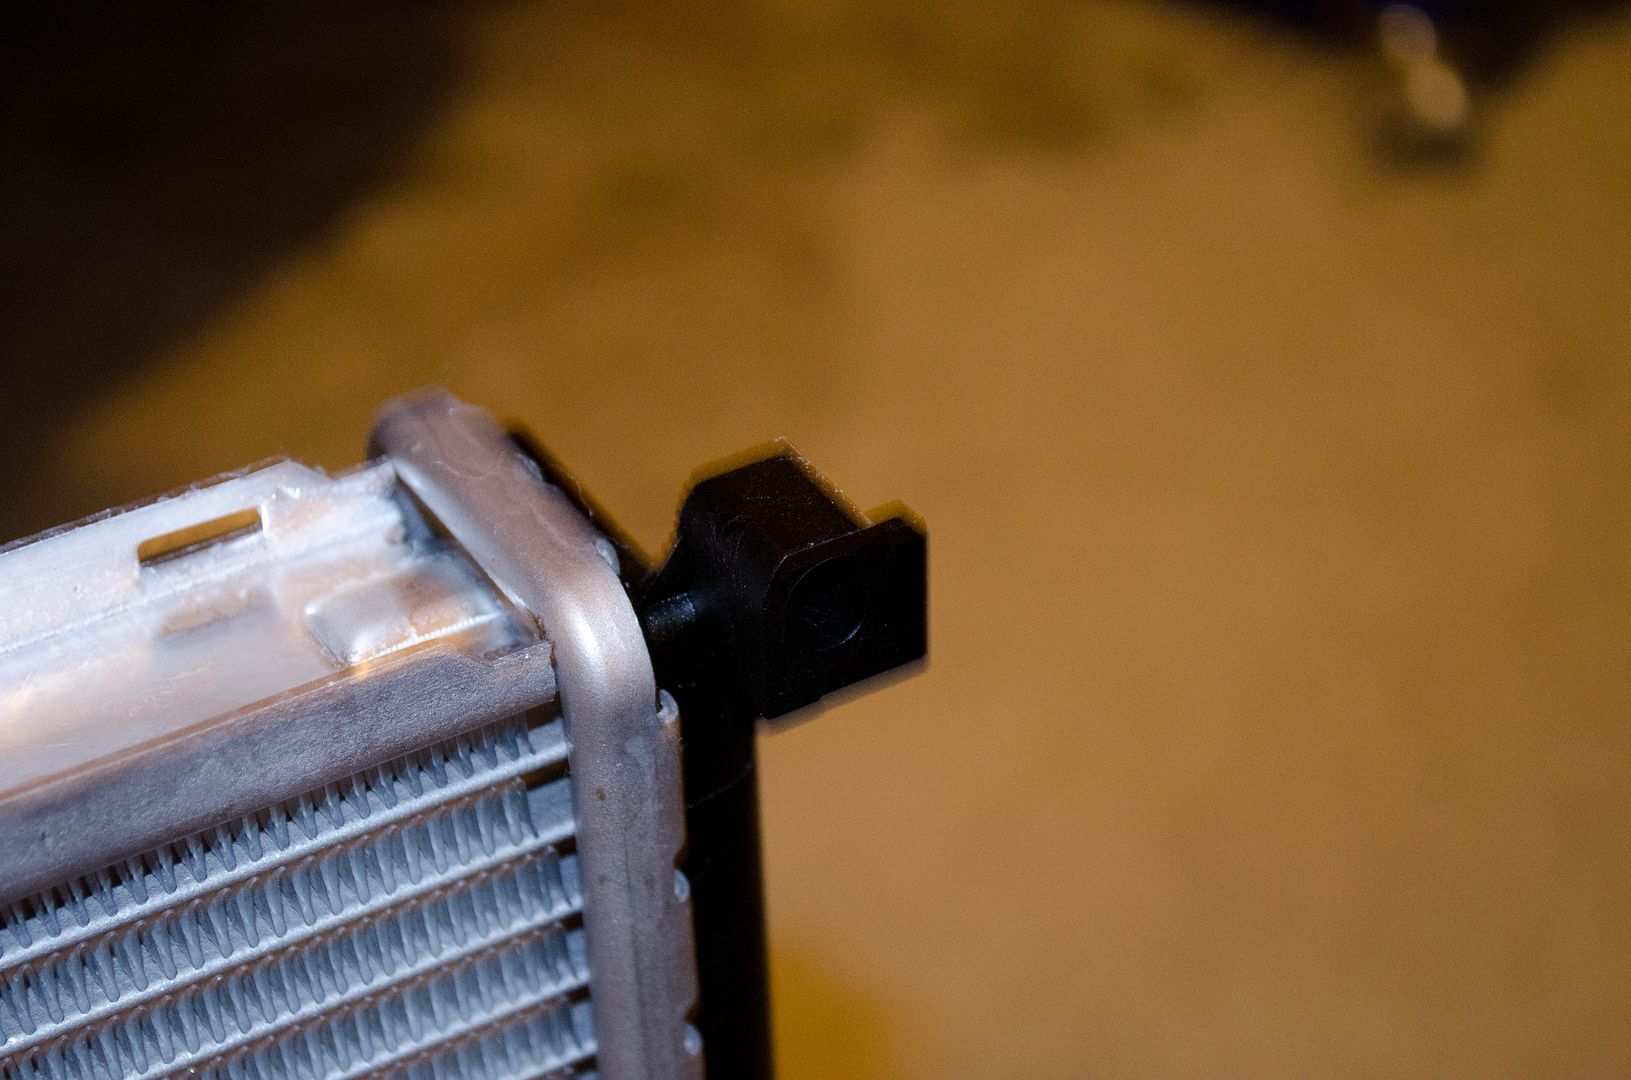
    After the radiator is aligned properly...above....Hang the expansion tank and "Frame assembly on the drivers side edge, ensuring Both fastening points are lined up. Both fastening points are shown below.

    Upper expansion tank frame mount point


    Lower expansion tank frame mount point


    Secure the bottom of the radiator to the frame using the fastening point on the lower drivers side expansion tank frame. It's located just below the blue drain plug.

    Secure the upper portion of the frame.

    STEP 4.

    Hook up all hoses and plug in electrical connectors. Ensure lower drain plug is tight (18nm). I used a little bit of electrical parts spray on the connections to ensure no problems down the road.

    It is far easier to hook hoses up to the thermostat first, vice hooking the hoses into the radiator first.

    STEP 5.

    Lower the aux pusher fan into place.....

    Secure the aux pushet fan, into the two upper radiator mounts points described in STEP 1.

    STEP 6.

    Install intake and and scoop.

    STEP 7.

    I left the front end raised for the bleed. I poured 1 gallon of distilled water, and 1 gallon BMW coolant into a nice clean bucket, and mixed well. The I filled the water gallon jug back up with the mix, to ensure I had decent control when filling the system.

    Open bleed screw and remove expansion tank fill cap.

    Place car ignition into position 2 and do not start. Ensure fan is set to 91*F, and fan is on low setting.

    Then.....using a funnel....slowly pour the coolant into the cooling system via the expansion tank.

    I went very slow on the add....and I was able to get all of 2 gallons into my car.....with zero coolant emitting from the bleed hole of expansion tank top (I think this is attributed to a complete drain performed).

    After bleed is complete......tighten bleed screw, replace cap, and take for a test spin....not to far from the house...just in case a leak appears.
    Call Me Dane l 2/2004 330i ZHP l 18x8 ET45 BBS CK's wrapped with Michelin Pilot Sport AS3+ @ 245-40-18 l KW V1 Coilovers in front l KW V1 springs w/ Bilstein B8 dampeners in rear l BMW Performance Rotors l UUC StrutBarbarian l Racing Dynamics Rear Strut Bar l Jim Conforti Shark Injector l Light Birch Interior Trim l Bimmian Celly Mount l M3 Trunk Mat l l e90 Performance E-Brake & Shift Knob l M3 Tri-Stitched Boots l AL Headlight Retrofit with ZKW Lenses l CobyWheel Wrap w/M3 Stitching l LCM sw 4.5 triple blink and rear fogs l Maple Interior Trim

  2. #2
    Join Date
    Jan 1970
    Location
    Ocean County, NJ
    Posts
    7,273
    This, among many other reasons, is why I heart you.

    Thanks for taking the time to do this.

    Nice werk!
    -Be yourself; everyone else is already taken.
    ZHP Pre-Ride Briefing

    2005 ZHP, Alcantara, Silver Cube, Nav, Sharked, BMW Perf Intake, BMW Perf CF Strut Brace, CF Valve/Fuel Rail Covers,
    Shadowline Grills, CF Splitters, Fog Light Inserts, Euro-mirrors, CDV Delete, Beisan vanos, GAS DISA, BP Coded

  3. #3
    Join Date
    Feb 2011
    Location
    Valparaiso, IN
    Posts
    3,595
    Now that is a quality diy! Hope I never have to do it myself though...


  4. #4
    Join Date
    Jan 1970
    Location
    Liberty Township, OH
    Posts
    37,935
    Thanks guys. Felt good driving her tonight.
    Call Me Dane l 2/2004 330i ZHP l 18x8 ET45 BBS CK's wrapped with Michelin Pilot Sport AS3+ @ 245-40-18 l KW V1 Coilovers in front l KW V1 springs w/ Bilstein B8 dampeners in rear l BMW Performance Rotors l UUC StrutBarbarian l Racing Dynamics Rear Strut Bar l Jim Conforti Shark Injector l Light Birch Interior Trim l Bimmian Celly Mount l M3 Trunk Mat l l e90 Performance E-Brake & Shift Knob l M3 Tri-Stitched Boots l AL Headlight Retrofit with ZKW Lenses l CobyWheel Wrap w/M3 Stitching l LCM sw 4.5 triple blink and rear fogs l Maple Interior Trim

  5. #5
    Join Date
    Jan 1970
    Location
    Southern California
    Posts
    18,064
    Quote Originally Posted by danewilson77 View Post
    Thanks guys. Felt good driving her tonight.
    Congrats, I'm sure it did. Nice DIY too.
    Randeaux/Rando/John/jr - '06 Cic ZHP; Southern California
    "ZHP or not, I still like you"


    ZHP Performance Package, Cold Weather Package, Leather, Jet Black/Black/BlackCube, NAV, Anthracite Black "my individual" interior trim
    ESS Stage 1 Twin Screw Supercharger, Sprint Booster, BMW Perf Intake, Magnaflow Exhaust, Dinan TB & STEP S/W, UCC Sway Bars, Apex EC-7 18x8.5 ET38
    Suspension: AST 44100 dampers, Bimmerworld front adjustable end links, Swift springs (8K front, 10K rear), Vorshlag camber plates
    Dynavin D99+, Hardwire V1 (w/V1 Connection), BSW Stage 1 Speakers, Kicker Amp/Subwoofer
    BMW Performance Strut Brace, Orion V2 Angel Eyes, No-holes License Plate, SMG Paddle Shift Mod, Besian VANOS, Gold DISA, Fan Delete, M3 Side Mirrors
    Note: Actual car no longer resembles signature picture

  6. #6
    Join Date
    Aug 2011
    Location
    San Ramon, Calif. Bay Area
    Posts
    1,190
    Great write up. Thanks for the time to record that info I know its difficult to stop in the middle of the job and take pics.

    sent from Dennis' Droid using tapatalk

Similar Threads

  1. Smaller Upper Radiator Hose Leak
    By Crestwood1001 in forum Mechanical | Troubleshooting
    Replies: 18
    Last Post: 06-01-2013, 03:04 PM
  2. Just noticed the radiator fan is a hair away from the upper hose
    By Dave1027 in forum Mechanical | Troubleshooting
    Replies: 9
    Last Post: 04-25-2013, 06:56 AM
  3. Radiator outlet switch leak
    By Mtnman in forum Maintenance
    Replies: 14
    Last Post: 01-19-2012, 01:52 PM
  4. Anyone get the Mizu radiator?
    By zhpnsnv in forum Maintenance
    Replies: 5
    Last Post: 12-18-2011, 10:47 AM
  5. Which radiator?
    By edlvrt in forum Maintenance
    Replies: 6
    Last Post: 11-07-2011, 06:22 AM

Posting Permissions

  • You may not post new threads
  • You may not post replies
  • You may not post attachments
  • You may not edit your posts
  •