Yeah...I got you. I guess I had my mind on this computer when I said...what I said. I understand your direction.


 Capo di tutti capi
Yeah...I got you. I guess I had my mind on this computer when I said...what I said. I understand your direction.
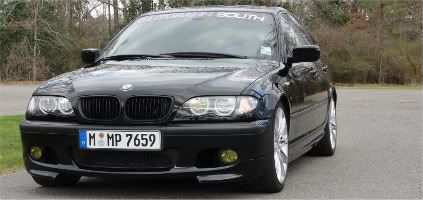
Call Me Dane l 2/2004 330i ZHP l 18x8 ET45 BBS CK's wrapped with Michelin Pilot Sport AS3+ @ 245-40-18 l KW V1 Coilovers in front l KW V1 springs w/ Bilstein B8 dampeners in rear l BMW Performance Rotors l UUC StrutBarbarian l Racing Dynamics Rear Strut Bar l Jim Conforti Shark Injector l Light Birch Interior Trim l Bimmian Celly Mount l M3 Trunk Mat l l e90 Performance E-Brake & Shift Knob l M3 Tri-Stitched Boots l AL Headlight Retrofit with ZKW Lenses l CobyWheel Wrap w/M3 Stitching l LCM sw 4.5 triple blink and rear fogs l Maple Interior Trim
 Messaggero
My laptop or my car?Originally Posted by Tampa330i

Lappy is an HP dv5T
ZHP is '04 330i 6MT
Capo di tutti capi
Well....this is the ZHP section...so he must be talking about the car.
Call Me Dane l 2/2004 330i ZHP l 18x8 ET45 BBS CK's wrapped with Michelin Pilot Sport AS3+ @ 245-40-18 l KW V1 Coilovers in front l KW V1 springs w/ Bilstein B8 dampeners in rear l BMW Performance Rotors l UUC StrutBarbarian l Racing Dynamics Rear Strut Bar l Jim Conforti Shark Injector l Light Birch Interior Trim l Bimmian Celly Mount l M3 Trunk Mat l l e90 Performance E-Brake & Shift Knob l M3 Tri-Stitched Boots l AL Headlight Retrofit with ZKW Lenses l CobyWheel Wrap w/M3 Stitching l LCM sw 4.5 triple blink and rear fogs l Maple Interior Trim
 Enforcer
Sorry, yes, I meant laptop. Yours is plenty powerful enough to run this stuff.
 Capo
Capo
We should probably move all software- and computer-related stuff over to the existing thread for this software...
We're getting quite off topic.
BP
2005 330i ZHP / 6MT
Imolarot / Naturbraun
2003 330iT / 6MT
Orientblau / Naturbraun
It's not the car you drive, it's how you drive it.
Enforcer
Yes, back to headlights. I'm doing my taxes today, and I haven't filed in 3 years. Hopefully I should see a large chunk of change for a refund, then I'll go ahead and buy the fx-r retrofitted p46s from umnitza. I'll take the first leap on these, I can't find anyone else that has them. I also plan on doing them myself, so that'll be fun. I know I need a magnet or claw tool to get the back lower bolts out, do I need any more specialized tools or wire accessories or anything besides screwdrivers, sockets, and wrenches? I'm starting to think I should throw a set of new ballasts in there as well, is there any better way of attaching these than tape?
Capo
Don't you lose high beam functionality with these? I mean push-stalk functionality, not pull. That would be highly annoying for me...
Why would you need special tools for that? Can't you just have to take the intake out?I know I need a magnet or claw tool to get the back lower bolts out, do I need any more specialized tools or wire accessories or anything besides screwdrivers, sockets, and wrenches?
You could do it the proper way; buy brackets, drill holes, and mount using nuts and bolts.I'm starting to think I should throw a set of new ballasts in there as well, is there any better way of attaching these than tape?
BP
2005 330i ZHP / 6MT
Imolarot / Naturbraun
2003 330iT / 6MT
Orientblau / Naturbraun
It's not the car you drive, it's how you drive it.
Enforcer
The fx-r is bixenon. According to umnitza, I will keep bixenon functionality with these. Even if I lost bixenon, I already have coded the halogen highbeams to come on in addition to xenon highbeams when I push the stalk forward(and fogs stay on as well). I am not mechanical and have never changed headlights on any car, I have no idea what tools would be needed. Just getting all my ducks in a row beforehand so I'm not making runs to autozone while I'm trying to install them. I'm checking with umnitza now on ballast fitment with these premium p46s, apparently they can't handle my technical question over email, so I have to call them.
 Enforcer
Just as a follow up on my situation.
I decided not to spend the money on any type of Xenon retrofit or swap; that money went toward the track car....
What I did was replaced the lenses and upgraded the low beam bulbs with a set of Osram Rallye 65w bulbs. This was based on the recommendation of the lighting freaks over at the candlepower forums.....
- now with 5 speeds
Enforcer
Despite my ZHP only having been driven to church on Sundays (and only in nice weather), the lenses on the headlights were pretty worn out.
Trust me, the photos make them look better than they really were. That's also after I polished them last year.
So, let's start with removal.
On facelift sedans, there's 4 screws to remove. 3 are easy to reach - the 4th will take some precision and something magnetic.
Looking at the photo above, the corner light is removed via the screw on the right. Loosen the screw, pull the light out - easy.
The two bolts on the top of the headlight will be removed, along with the one at the back (not shown) and the one buried in the bumper/grill area (not shown).
There's plenty of writeups that cover these locations, so this is just an overview.
Once the screws are removed, I disconnected the lower trim piece and then slid the entire assembly out of the car. I left the headlight washers and trim piece still on the car. It's not difficult to do at all. The washers will extend a considerable distance. Be sure all the wiring has been disconnected from the headlight.
Another shot of the headlight removed.
Closeup of the trim piece and how it disconnects. Two clips on the outside, and one on the inboard area near the center grill.
Shot of the car without any lights - always such an odd look.
There are seven clips around the outside of the lens. Pop those off and the lens will lift right off of the assembly.
Old lens removed.
Lens removed, and bulb sockets removed.
New lens gasket installed. It's recommended you replace then when removing the lens.
It simply fits in the channel along the outside of the assembly. The old gasket was pretty compressed.
Shot of the old and new gasket.
New lens installed. It simply clips back in place as a compression fit. It'll take some effort to compress the new gasket.
Yes, there's actually a lens installed.
Installed in the car again.
Both sides reinstalled.
Test with new bulbs installed.

- now with 5 speeds
 Posting Permissions

 Reply With Quote