Materials to Maintain Your ZHP IIIII Hand Protection IIIII Tools to Maintain Your ZHP
Page 1 of 3 123 LastLast
Results 1 to 10 of 22
  1. #1
    Join Date
    Apr 2012
    Location
    Jupiter, FL
    Posts
    5,160

    DIY: Remove/Replace front bumper and refurbish lower grille doityourself

    Alright everyone, I feel the need to donate to the forum, and recent work led me to believe that we need this DIY... Firstly, I hear of too many people with complaints of the lower grilles turning white. Also, being able to take the front bumper off helps with a lot of other jobs, so I figure this writeup will pose useful... Anyway, on to the job!

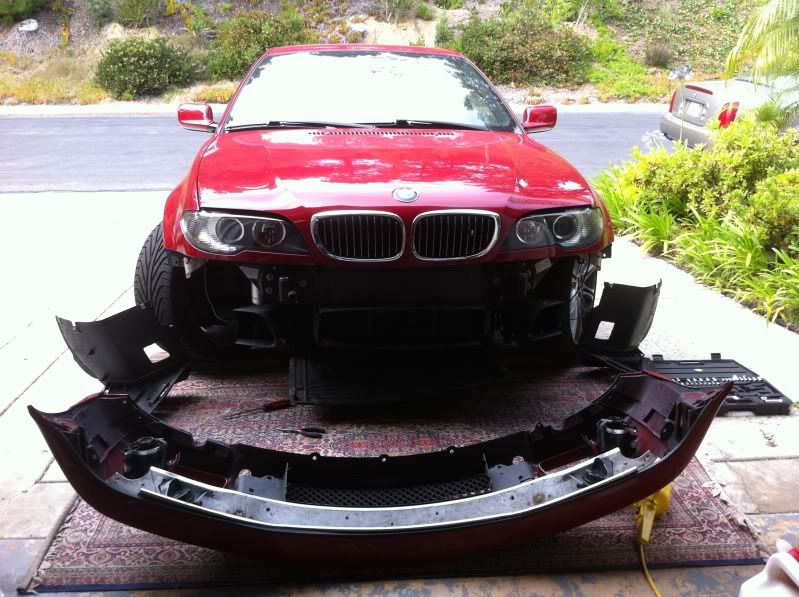
    1. Ideally, jack up the car to give yourself more room to work and help relieve strain on your back.

    2. In each fender well, just in front of each front wheel, you'll see two 8mm bolts. The outer one needs to be removed on each side. Two bolts in total.

    Name:  IMG_0725.jpg
Views: 5095
Size:  209.1 KB

    3. On the under side of the bumper, there are two more 8mm bolts (on each side). Both of these need to be removed. The first one is in the small hole in the outer bumper cover (upper middle of the photo) and the other one is where the tab is (mine is already removed, lower middle of the photo). Take both of these out, on both sides, four bolts in total.

    Name:  IMG_0724.jpg
Views: 4612
Size:  234.7 KB

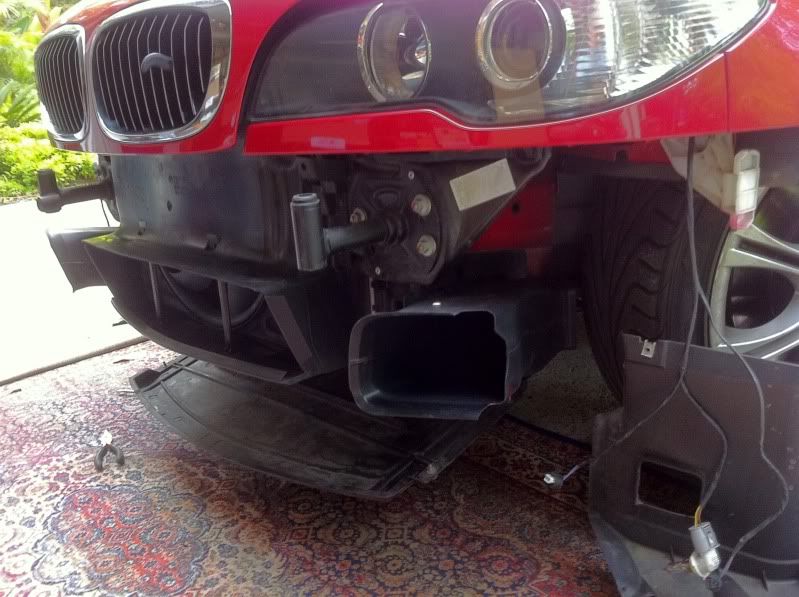
    4. Now comes the fun part. The big bolts. Holding the actual bumper on (the metal parts that's under your fancy M-tech bumper cover) are two large bolts. They actually have an external Torx head, but I didn't have the right torn socket. Instead, I found that a 6 point 10mm socket works just fine. That being said, there are two of these bolts. You access them from the underside of the bumper. There are large holes in the underside of the bumper. If you look up into those holes, you'll see the bolts. (This is where jacking up the car helps). In the following pic, you can see the holes, just on the inside of my splitters.

    Name:  IMG_0718.jpg
Views: 4566
Size:  367.7 KB

    5. You will loosen these bolts until they fall loose a little bit (you'll feel them rattle around a little) but they won't fall completely out. The reason for this is because the plastic guides for these bolts have small tabs on them to hold them in place. You have to get a hold of the bolts and actually pull on them to pull them past the small tabs. Once you do this, they will come completely out. Here's the tough part... Even my long reach needle nose pliers weren't able to get up there and grab the bolts. I found the next easiest thing was to push in fairly hard on the lower grille, at the outside edges of it. If you press the sides in until they pop off the tabs, you'll be able to see inside the bumper and see the big bolts, RIGHT there. Then you can just reach in and grab them and pull them down, letting them fall out of the bumper. The following pics show these bolts, the plastic guides with the little keeper tabs, as well as their location in relation to the lower grille.

    Name:  IMG_0720.jpg
Views: 5342
Size:  397.6 KB
    2011 E90 Lemans Blue/Bamboo Beige M3- Harrop Supercharged IG: lmb_zcp
    2013 F25 Alpine White/Chestnut X3 35i- Family Hauler
    2006 R53 British Racing Green/Panther Black Mini Cooper S FOR SALE! DM for details!
    Past: 2010 X5M, 2014 328d, 2003 330i ZHP, 2004 330i ZHP, 2012 X3 35i
    WTB!! 2009-2012 E91 328i Touring Contact me with info!

  2. #2
    Join Date
    Apr 2012
    Location
    Jupiter, FL
    Posts
    5,160
    Here are more pics showing the main bumper bolts and the plastic guides with the little keeper tabs...

    Name:  IMG_0681.jpg
Views: 7355
Size:  294.2 KB

    Name:  IMG_0682.jpg
Views: 4309
Size:  291.1 KB

    Name:  IMG_0683.jpg
Views: 4322
Size:  282.0 KB

    Name:  IMG_0684.jpg
Views: 4349
Size:  276.1 KB

    6. Ok, so now that you have those big bolts out, the bumper is essentially ready to come off. But don't get too wild. You need to pull it off slowly and carefully as there are still things to consider. Firstly, there is the trim piece under the headlights. Be careful of this. Once you clear both sides of the headlight trim, you have to not pull too far. Carefully slide one side out at a time, just enough to disconnect two connectors on each side. One is for the fog lights, the other for the horn. Once you get all four connectors unplugged, the bumper should be able to come off. Ideally, you'll want to have a blanket or towel on the ground. Make sure to lay the bumper on the face. If you try to set it down on the bottom, the weight of the reinforcement bumper underneath will cause it to flip over onto its face. Set it down like mine is in the previous post...

    7. From here, you'll now see all the little plastic tabs that hold the lower grille on. One by one, pop them out and remove the grille backing piece as well as the lower grille. I used some semi-gloss black paint and gave them MANY coats of paint.

    Once you're done, installation is, as they say, the reverse of removal... .

    This was my result... Very pleased!

    Name:  IMG_0726.jpg
Views: 4285
Size:  157.8 KB
    2011 E90 Lemans Blue/Bamboo Beige M3- Harrop Supercharged IG: lmb_zcp
    2013 F25 Alpine White/Chestnut X3 35i- Family Hauler
    2006 R53 British Racing Green/Panther Black Mini Cooper S FOR SALE! DM for details!
    Past: 2010 X5M, 2014 328d, 2003 330i ZHP, 2004 330i ZHP, 2012 X3 35i
    WTB!! 2009-2012 E91 328i Touring Contact me with info!

  3. #3
    Join Date
    Jan 1970
    Location
    Liberty Township, OH
    Posts
    37,935
    Nice writeup Joop.

    Thanks.

    Sent from the HTC DNA, Williamsburg, VA and USA
    Call Me Dane l 2/2004 330i ZHP l 18x8 ET45 BBS CK's wrapped with Michelin Pilot Sport AS3+ @ 245-40-18 l KW V1 Coilovers in front l KW V1 springs w/ Bilstein B8 dampeners in rear l BMW Performance Rotors l UUC StrutBarbarian l Racing Dynamics Rear Strut Bar l Jim Conforti Shark Injector l Light Birch Interior Trim l Bimmian Celly Mount l M3 Trunk Mat l l e90 Performance E-Brake & Shift Knob l M3 Tri-Stitched Boots l AL Headlight Retrofit with ZKW Lenses l CobyWheel Wrap w/M3 Stitching l LCM sw 4.5 triple blink and rear fogs l Maple Interior Trim

  4. #4
    Join Date
    Apr 2012
    Location
    Jupiter, FL
    Posts
    5,160
    Anything I can do to help! When we (myself, rando, and William) first did this on William's car, the only writeup we found didn't have the best pictures (not that mine are much better) and it wasn't on a ZHP bumper, so it was a little different...

    Oh, and just FYI to all reading this... Its the same for coupe/vert and sedan! Good luck folks!
    2011 E90 Lemans Blue/Bamboo Beige M3- Harrop Supercharged IG: lmb_zcp
    2013 F25 Alpine White/Chestnut X3 35i- Family Hauler
    2006 R53 British Racing Green/Panther Black Mini Cooper S FOR SALE! DM for details!
    Past: 2010 X5M, 2014 328d, 2003 330i ZHP, 2004 330i ZHP, 2012 X3 35i
    WTB!! 2009-2012 E91 328i Touring Contact me with info!

  5. #5
    Join Date
    Jan 1970
    Location
    32.8 N, 117.3 W
    Posts
    7,640

    DIY: Remove/Replace front bumper and refurbish lower grille

    Great job!

    It's funny, I've been thinking of doing a DIY on this for a while. Trying to figure out how to get mine off were the reason for my first posts ever on this forum!

    on num 2 - where you just removed the two outer screws, I removed all of them and took the whole wheel liner out. You can then easily disconnect the fog lights and maybe the horns (don't remember). On the bottom of the drivers side liner is the temp sensor, be careful with that.


    one last thing - Jon, in the pic you posted for num 3 you're likely missing the expansion rivets that hold the rear of the bumper to the front of the drip pan. I forget pn but they're cheap
    Last edited by Hermes; 04-13-2013 at 09:41 PM.

  6. #6
    Join Date
    Dec 2012
    Location
    Socal
    Posts
    1,642
    Looks awesome. Possibly do that at the reunion as well


    Tony's ZHP "Wulf" '03 Silver Gray | Valentine 1 Radar Detector| Alcantara | BMW Performance Intake | F10 M5 Knob | Auto-dim Retrofit | BMW Alarm | Performance Grilles | OEM Roof Rack | Rain Light Sensor Retrofit | Eonon D5150 Head Unit | BMW OEM Clear Lens


  7. #7
    Join Date
    May 2012
    Location
    Atlanta, Georgia
    Posts
    1,008
    Where was this 2 hours ago?! I started looking at my bumper and how I should approach the removal and gave up. I told myself I could remove the grille from the bumper to plasti-dip without removing the bumper.... and I somehow did it!


    Thank's for the right up. I'll be sure I use it when I start the body work on the ZHP.

  8. #8
    Join Date
    Apr 2012
    Location
    Jupiter, FL
    Posts
    5,160
    Quote Originally Posted by Hermes View Post
    one last thing - Jon, in the pic you posted for num 3 you're likely missing the expansion rivets that hold the rear of the bumper to the front of the drip pan. I forget pn but they're cheap
    Ah yes, I didn't think about that as I don't seem to have that plastic drip pan, and on second thought, William's car didn't have it either. Good catch tho!


    Quote Originally Posted by Tnhl1989 View Post
    Looks awesome. Possibly do that at the reunion as well
    Sure thing. I can definitely help with that... You'd be surprised, but the whole process takes about 20 minutes or so once you know where the bolts are...
    2011 E90 Lemans Blue/Bamboo Beige M3- Harrop Supercharged IG: lmb_zcp
    2013 F25 Alpine White/Chestnut X3 35i- Family Hauler
    2006 R53 British Racing Green/Panther Black Mini Cooper S FOR SALE! DM for details!
    Past: 2010 X5M, 2014 328d, 2003 330i ZHP, 2004 330i ZHP, 2012 X3 35i
    WTB!! 2009-2012 E91 328i Touring Contact me with info!

  9. #9
    Can u give me a part number and brand you used for the paint please.

  10. #10
    Join Date
    Apr 2012
    Location
    Jupiter, FL
    Posts
    5,160
    Jorge- I just went to the local Walmart and picked up a can of Krylon Fusion paint... Its the one recommended for plastics. Honestly, it probably doesn't even matter that much. The key to successful spray paint is technique. Even spray, slow but steady movements. Stop the spray at the end of each pass. 6-8" distance when spraying. Spray in different directions. Many thin coats is better than one thick coat...

    Good luck buddy!
    2011 E90 Lemans Blue/Bamboo Beige M3- Harrop Supercharged IG: lmb_zcp
    2013 F25 Alpine White/Chestnut X3 35i- Family Hauler
    2006 R53 British Racing Green/Panther Black Mini Cooper S FOR SALE! DM for details!
    Past: 2010 X5M, 2014 328d, 2003 330i ZHP, 2004 330i ZHP, 2012 X3 35i
    WTB!! 2009-2012 E91 328i Touring Contact me with info!

Page 1 of 3 123 LastLast

Similar Threads

  1. Replies: 65
    Last Post: 05-12-2014, 06:04 PM
  2. Best black front grille option for ZHP Sedan (oem?)
    By kaboom in forum General -- ZHP Related
    Replies: 49
    Last Post: 10-22-2011, 01:47 PM
  3. Wanted: DIY suggestions for lower grille rehab
    By aurelius in forum Detailing
    Replies: 27
    Last Post: 10-05-2011, 08:35 AM
  4. Replies: 15
    Last Post: 12-23-2010, 10:01 AM
  5. Tail lights & front grille installed
    By Tampa330i in forum ZHP Gallery and Video Section
    Replies: 20
    Last Post: 12-22-2010, 06:57 PM

Posting Permissions

  • You may not post new threads
  • You may not post replies
  • You may not post attachments
  • You may not edit your posts
  •